# Dhee.AI

India's most loved conversational AI

Greetings from DheeYantra !!

![](https://2566128011-files.gitbook.io/~/files/v0/b/gitbook-x-prod.appspot.com/o/spaces%2FUn1oKrw7P8P5qiTjWXjv%2Fuploads%2FL4nbHW0FakUC5Ej5GK3X%2Ftitle.png?alt=media\&token=948f8a1d-df27-42fd-b390-b4af0fc5663d)

We are happy to introduce you to the development of effective voice assisted chatbots and voicebots using DheeYantra's flagship platform, Dhee.AI. \
\
Dhee.AI is a multilingual Conversational AI and Natural Language Processing platform that enables businesses to make their existing technologies capable for engaging and serving their customers (or the market) in the the latter's spoken language.

This documentation has been constructed considering beginners and experts alike. If you are new to Natural Language Processing and would like to learn the basic concepts, you could begin with our Introduction to NLP Concepts series - **Concepts We Work On**. The series also leverages *visual storytelling* as a means of helping you understand the key concepts of NLP.

{% content-ref url="/pages/sIsp6dEhrB0SZtECydPv" %}
[Concepts We Work on](/concepts-we-work-on)
{% endcontent-ref %}

If you are an expert or business entity and would like to use Dhee.AI's premium developer platform to build your chatbots, you would use our exhaustive documentation for configuring your chatbot.

{% content-ref url="/pages/46oP5DkbhnKgcGmE2o4j" %}
[Platform Reference](/platform-reference)
{% endcontent-ref %}


# Concepts We Work on

Because maths precedes the physics.

Dhee.AI is a vertically integrated stack of natural language processing and speech technologies which come together to work seamlessly as voice assisted chat-bots and voice bots - capable to concurrently engage with thousands of users.

To help you in training the bots better on our platform, we shall be giving you key insights on the components and concepts which are the building blocks of Dhee.AI.

Equipped with these insights, you shall be able to debug your bots faster and take quick and effective remedial actions to fix the bugs or gaps identified by your end users.

### Natural Language Processing (NLP)

At the heart of what we do is Natural language processing. You can get a short introduction to it by visiting the below link. Also note that the components of NLP used extensively in Dhee.AI are introduced as sub-topics which you can access and read using the corresponding links.

{% content-ref url="/pages/1xKyzAh6zcB4EfyHzn28" %}
[Natural Language Processing (NLP)](/concepts-we-work-on/natural-language-processing-nlp)
{% endcontent-ref %}

![](https://2566128011-files.gitbook.io/~/files/v0/b/gitbook-x-prod.appspot.com/o/spaces%2FUn1oKrw7P8P5qiTjWXjv%2Fuploads%2FSCi2fvefuFwWehpBULeo%2Fwhat-is-nlp101.png?alt=media\&token=9e058067-6b4c-4e15-bb59-b1f57fe4fdf7)

#### Natural Language Parsers

The first action done by Dhee.AI when a human speaks to it is to parse it using a natural language parser to get the parts of the speech, entities, and the general semantic relationship between entities and verbs in the spoken utterance.

Read more about this elaborate parsing pipeline using the below link.

{% content-ref url="/pages/Q5L52d37v88ubazHZqWS" %}
[Natural Language Parser Pipeline](/concepts-we-work-on/natural-language-parser-pipeline)
{% endcontent-ref %}

#### Context Vectors (Word Embeddings)

Parsing and finding structure of a spoken utterance is only the beginning of the journey. The next step involves semantic analysis. Here we try to enrich the parse output with more semantic information. This is done by injecting the contextual vector of each word into the parse output.

![](https://2566128011-files.gitbook.io/~/files/v0/b/gitbook-x-prod.appspot.com/o/spaces%2FUn1oKrw7P8P5qiTjWXjv%2Fuploads%2F30RBIwOXZpQET82B16OZ%2Fword2vec.jpg?alt=media\&token=487a7fd2-654e-464e-8479-dad08b2edc86)

Read more about word embedding by visiting the below link.

{% content-ref url="/pages/PdlHxLGBqOBGdyAMhzvP" %}
[Word Embeddings](/concepts-we-work-on/word-embeddings)
{% endcontent-ref %}


# Natural Language Processing (NLP)

## What is NLP?&#x20;

Ever wondered how your Alexa is so smart to understand your speech and complete meaningful actions? How could a machine become so intelligent that it could not only process the voice command but also learn and adapt as they go on? How is it possible for machines to talk and respond to us in a human-like manner?&#x20;

It is surprising to realize that we have been consumers of NLP applications even without recognizing them. Your smart assistants (Alexa, Siri), bots on your favorite pizza center's website, spell checks and predictive texts, digital phone calls - the list goes on and on.

![](https://2566128011-files.gitbook.io/~/files/v0/b/gitbook-x-prod.appspot.com/o/spaces%2FUn1oKrw7P8P5qiTjWXjv%2Fuploads%2FSCi2fvefuFwWehpBULeo%2Fwhat-is-nlp101.png?alt=media\&token=9e058067-6b4c-4e15-bb59-b1f57fe4fdf7)

## What are Natural Languages?

Before we get into NLP, let us take a moment to understand what is natural language and why it is difficult to process it compared to formal language.

Formal Languages are specific languages designed by people for specific applications or scenarios. They are characterized by precise syntax and semantics, with mathematically precise construction rules. The strict construction rules of formal languages make them almost unambiguous, which makes them easier for the machine to decipher.

On other hand, Natural Languages are used by people and have evolved over time. They are more context-dependent compared to the formal languages and have weakened grammar rules as well. Natural languages are also characterized by semantic ambiguity, which is often resolved with the help of contextual information. This makes them harder for machines to understand and require processing before being fed into machines.

| Natural Language          | Formal Language      |
| ------------------------- | -------------------- |
| Weak grammer rules        | Strict grammer rules |
| Ambigous                  | Unambigous           |
| Verbose                   | Concise              |
| Uses Idioms and metaphors | Precise              |
| Context depdendent        | Context independent  |

## Natural Language Processing

Natural Language Processing or NLP, is a specialized branch of Artificial Intelligence that allows machines to read, understand and derive the meaning of natural languages, much like how humans do. The input from humans, text or voice, is (preprocessed and) processed by the NLP engines to make it more readable and understandable for the machines to analyze the data. This would allow machines to initiate suitable actions in response to human input.

NLP uses a mixture of Artificial Intelligence and Computer Science, along with Computational linguistics and machine learning to decipher meaning from texts and speech, including the speaker's sentiment and intent.

## Application of NLP

You live in a world that is surrounded by NLP applications and you have been consuming them without recognizing them. Some of them include

* Smart Assistants like Alexa and Siri
* Chatbots
* Speech recognition software
* Autocorrection and spell/grammar checks
* Email filters
* Language Translations
* Digital Phone Calls
* Data analytics
* Targeted Advertising

## What it means to Business

Most of the information available through any medium of communication is mostly in natural languages, which is meaningless to machines. NLP allows these enormous amounts of information to be parsed and analyzed for business development. Insights from the data, that could be objectified and analyzed, could help in improving decision making, in addition, to aiding in market research and brand positioning.

The businesses could benefit by employing bots, significantly reducing cost and effort, in addition, to providing 24x7 service to the customers. The analyzed data could also help in improving and streamlining the process within the organization.

###


# Large Language Models (LLMs)

Words shape the universe.

Large Language Models (LLMs) are neural networks trained to understand and generate human language at scale.

At Dhee, we work **exclusively with transformer-based LLMs**, as they currently provide the most reliable foundation for high-quality, multilingual, and conversational systems.

Transformer architectures enable models to process entire sequences in context, making them especially suitable for complex language understanding and generation tasks.

<figure><img src="https://2566128011-files.gitbook.io/~/files/v0/b/gitbook-x-prod.appspot.com/o/spaces%2FUn1oKrw7P8P5qiTjWXjv%2Fuploads%2FH11ETk7bCtfmjyxeepCq%2Fthe-annotated-transformer_14_0.png?alt=media&amp;token=da45f7eb-3a78-4abe-be52-e19f3fbdab48" alt=""><figcaption></figcaption></figure>

### Transformer-Based LLMs

Transformer-based LLMs model language by learning relationships between all tokens in a sequence simultaneously.

This allows them to:

* Maintain long-range context
* Capture nuanced grammatical and semantic relationships
* Scale efficiently with data and model size

These properties make transformers the dominant architecture behind modern LLMs used in production systems today.

### What Transformer-Based LLMs Are Good At

Transformer-based LLMs excel at:

* Natural language understanding
* Conversational response generation
* Translation across languages
* Summarization and rewriting
* Intent recognition
* Semantic similarity and entailment

They perform best when:

* Sufficient context is provided
* The task is language-centric
* High linguistic fidelity is required

### How Transformer-Based LLMs Work (Conceptually)

At a high level, transformer-based LLMs operate as follows:

1. **Tokenization**\
   Text is converted into tokens suitable for the model.
2. **Contextual Processing**\
   The transformer processes all tokens together, allowing each token to attend to every other token in the context.
3. **Token Prediction**\
   The model predicts the most likely next token, repeatedly, to generate an output.

This process enables coherent, context-aware language generation.

### Stateless by Design

Transformer-based LLMs are **stateless**.

Each interaction:

* Is processed independently
* Has no inherent memory of previous turns
* Relies entirely on provided context

Any persistent behavior are implemented **outside the model in Dhee GPT Platform.**

### Conversational LLMs in Indian Languages

A core focus at Dhee is building **conversational transformer-based LLMs for Indian languages**.

These models are designed for:

* Native conversational flow
* Spoken-language patterns
* Code-mixed inputs
* Multi-turn dialogue consistency

Rather than treating Indian languages as translation targets, these models are trained and adapted for **direct conversational competence**.

Our open model collection is available here for you to try and use in your projects:\
👉 <https://huggingface.co/collections/dheeyantra/dhee-nxtgen-qwen3-v2>


# Agentic LLMs

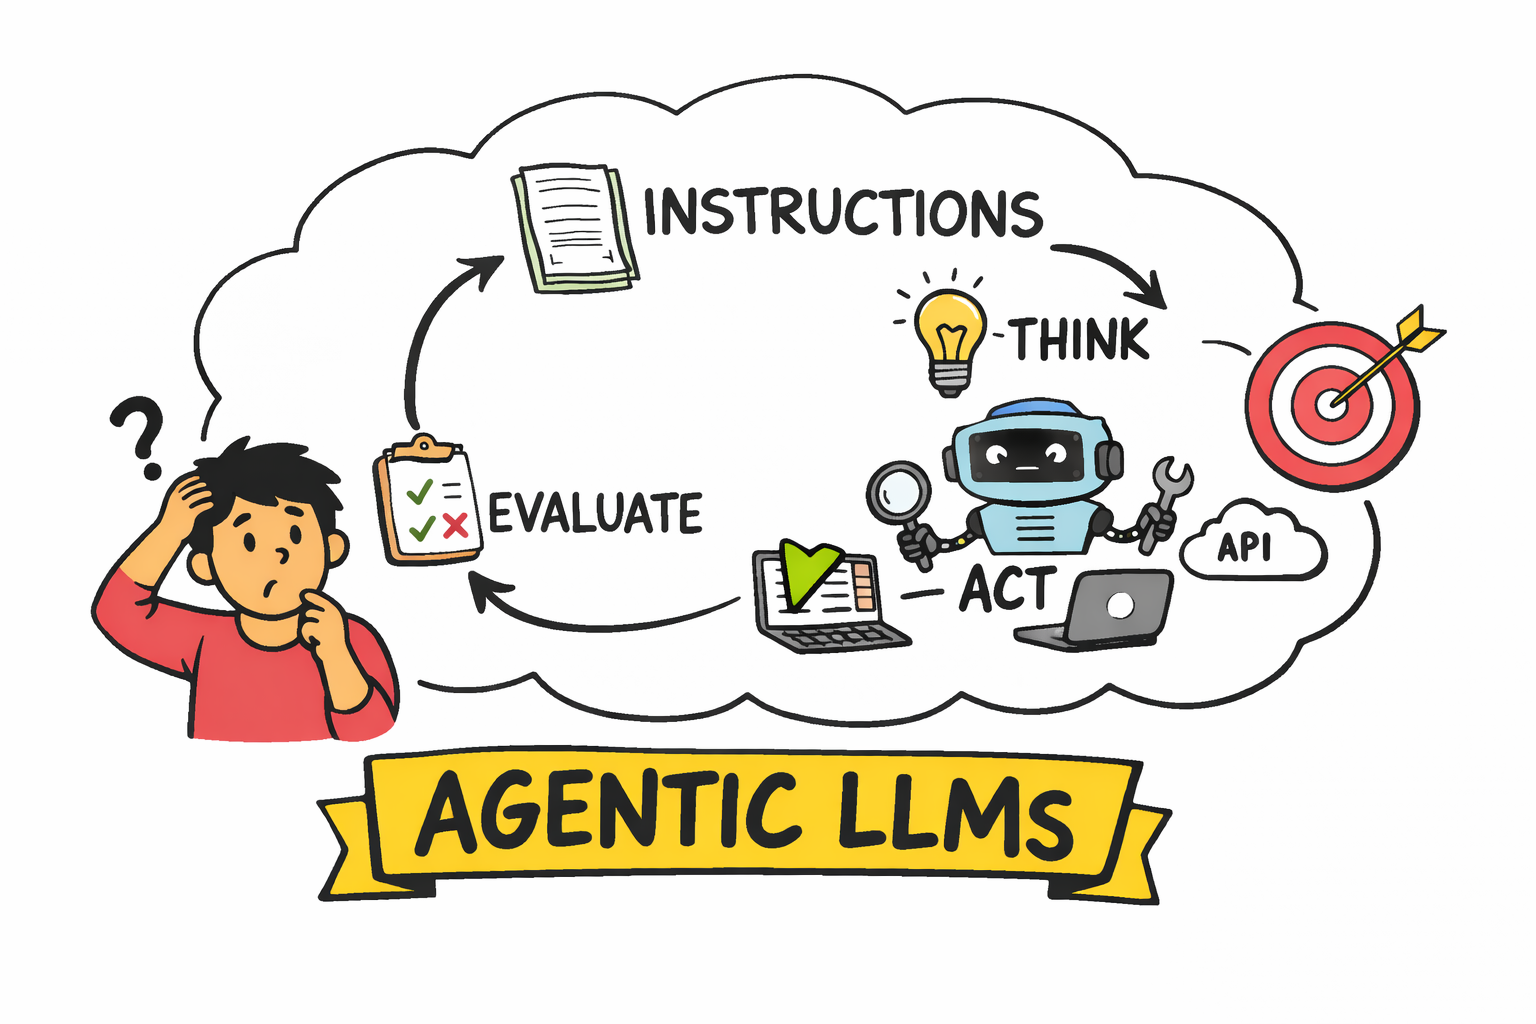
All words and no actions turn LLMs into Large Liability Models. Thus Enter the Agentic LLMs.

Large Language Models are powerful at understanding and generating language.\
However, **language alone is not enough** to solve real-world problems.

**Agentic LLMs** extend traditional LLMs by giving them the ability to **decide, act, observe outcomes, and adapt** — much like a human operator executing tasks step by step.

Instead of responding once and stopping, an agent **reasons over multiple steps**, uses tools, and works toward a goal.

<figure><img src="https://2566128011-files.gitbook.io/~/files/v0/b/gitbook-x-prod.appspot.com/o/spaces%2FUn1oKrw7P8P5qiTjWXjv%2Fuploads%2Fw76rd4vrpn5PuNVwr0do%2FChatGPT%20Image%20Dec%2020%2C%202025%2C%2011_14_19%20AM.png?alt=media&amp;token=e30c94ec-b252-4feb-8b4e-c45ea6509e78" alt=""><figcaption></figcaption></figure>

### Why Agentic LLMs Exist

A normal LLM answers questions.

An agentic LLM answers questions **and then does something about it**.

Examples:

* Reading a document → extracting facts → validating them → storing results
* Understanding a user request → choosing tools → calling APIs → verifying outputs
* Planning a multi-step task → executing → correcting mistakes → finishing the goal

Agentic behavior is essential when:

* The task **cannot be completed in one response**
* The system must **interact with external systems**
* The model must **self-correct or re-plan**

### Core Agent Loop

At the heart of an Agentic LLM is a simple but powerful loop:

1. **Observe**\
   Receive user input, system state, or tool outputs.
2. **Reason**\
   Decide what to do next based on goals and context.
3. **Act**\
   Call a tool, query a database, read a document, or ask a follow-up question.
4. **Evaluate**\
   Check whether the action helped achieve the goal.
5. **Repeat or Stop**\
   Continue until the objective is satisfied.

This loop turns a passive model into an **active problem solver**.

### Tools as Extensions of Cognition

In agentic systems, tools are not add-ons — they are **extensions of the model’s capabilities**.

Common tool types:

* Search engines
* Databases
* Code execution
* APIs
* Memory stores
* Document readers

The LLM does not *know* everything.\
Instead, it **knows how to find, verify, and combine information**.

### Planning vs Execution

Agentic LLMs often separate thinking into two layers:

* **Planner**
  * Breaks a goal into sub-tasks
  * Chooses execution order
* **Executor**
  * Performs each step
  * Reports results back to the planner

This separation improves:

* Reliability
* Debuggability
* Control over long-running tasks

### Memory in Agentic Systems

Unlike single-turn chatbots, agents require **memory**.

Types of memory:

* **Short-term**: current task context
* **Working memory**: intermediate results
* **Long-term**: user preferences, learned facts, prior executions

Memory allows agents to:

* Avoid repeating mistakes
* Maintain continuity
* Learn from previous runs

### Failure Is a Graceful

Agentic systems are **designed to fail safely**.

Instead of collapsing on errors, they:

* Detect failures
* Re-evaluate assumptions
* Retry with alternative strategies

This is critical for:

* Automation
* Enterprise workflows
* Mission-critical systems

### Agentic LLMs and Indian Languages

Most large language models are optimized primarily for **English-first interaction**.\
However, real-world conversational systems — especially in India — require **native competence across multiple Indian languages**, dialects, and code-mixed usage.

At Dhee, we work with C**onversational Agentic LLMs trained and adapted for Indian languages**, focusing on:

* Natural, spoken-style conversations
* Language-specific grammar and morphology
* Cultural context and usage patterns
* Multi-turn dialogue and Task following robustness

These models are designed not just to *translate*, but to **converse natively**.

You can explore our open model collection here:\
👉 [https://huggingface.co/collections/dheeyantra/](https://huggingface.co/collections/dheeyantra)


# Natural Language Parser Pipeline

Towards structure and meaning, one step at a time. (Part of Legacy, LLMs do it in one go now)

For anyone interested in data, the world today is filled with a massive amount of data. However, a greater part of this data is in unstructured form, mostly in natural languages. To make it useful for machines to read and decipher this data for analysis, the data needs to be processed and converted to useful forms which could be easily understood by machines.

So how do the NLP engines work? How are the documents comprising of a large amount of unstructured data being converted to useful forms? To answer these questions, let us first get accustomed to certain basics of the NLP pipeline.

![](https://2566128011-files.gitbook.io/~/files/v0/b/gitbook-x-prod.appspot.com/o/spaces%2FUn1oKrw7P8P5qiTjWXjv%2Fuploads%2FS35E384o0oVdusV601oQ%2Fwhat-is-nlp-overview101-low-resolution.png?alt=media\&token=daa8dd0f-43d8-4142-8cc8-bb334efc19a6)

### Corpus And Tokens

In terms of Linguistics, Corpus or Text Corpus is a large collection of structured text documents, usually stored electronically. Corpus acts as a source of data for linguists, which would be broken down and processed for further evaluation. Corpus is further broken down into documents, which is in turn broken down into sentences. Sentences are, in turn, broken down into tokens. Tokens are words or phrases, which help in understanding the context or interpreting the meaning of the sentence.

### NLP Prepreprocessing Pipeline

NLP Preprocessing Pipeline comprises a series of Micro steps, during which data is broken down into its constituent forms allowing it to be converted to useful and meaningful information for the machines to process. The key steps in the preprocessing pipelines are as follows

### Segmentation

Segmentation is the process of splitting a corpus into a group of semantically meaningful contiguous portions (sentences or sub-sentences). This is usually done along with the punctuations so as not to lose the essence of the sentence. For example, consider the following paragraph.

> *"Situated in the southern tip of India is the beautiful state of Kerala. Formed on Nov 1, 1956, Kerala is one of the most prominent tourist destinations in India. Blessed with beautiful beaches, backwaters, and hill stations, Kerala was named as one of the 10 paradises in the 1999 October edition of National Geographic Traveler Magazine."*

Sentence segmentation would divide the above data as following

* Situated in the southern tip of India is the beautiful state of Kerala.
* Formed on Nov 1, 1956, Kerala is one of the most prominent tourist destinations in India.
* Blessed with beautiful beaches, backwaters, and hill stations, Kerala was named as one of the 10 paradises in the 1999 October edition of National Geographic Traveler Magazine.

### Tokenization

Tokenization could be thought of as a special form of Segmentation that focuses on identifying boundaries between semantic units, or in other words, separating into smaller units called tokens. By breaking the sentences into tokens, we could now apply smaller and less complex rules to derive meaning from them. This would help in understanding the syntactic and semantic information in each sentence.

The most common form of tokenization is whitespace tokenization (also known as Unigram tokenization), which splits the sentence based on whitespace. This reduces the sentence into a group of words. The tokenization could be also used to remove punctuations and special characters from the sentences.

For example,

> "This place is so beautiful".

The above sentence, when applied with whitespace tokenization would be reduced to

"This" "place" "is" "so" beautiful"

### Stop Words Removal

*Stop Words Removal* is an optional step in the pipeline, which aims to remove common words in natural languages that adds little value while parsing the tokens for analysis. For example, consider the following sentence

> There is a book in my bag.

Some of the words in the above sentence ("is", "a", "in") are adding very little value, while other words ("there", "book", "my", "bag") contribute much more into understanding the meaning of the sentence. These stop words could be removed. Some of the most common stop words include "is" "in" "on" "the" "a" and many more.

While Stop Words removal is not mandatory, it does help in reducing the size of the dataset and hence impacts the time required for training with a fewer (and meaningful) token list.

### Stemming

Normalization is the process of converting tokens to their base form by reducing redundant information from the words. Linguists consider words to be comprised of *Morpheme* (base form of the word) and *inflectional forms* which are usually prefixes/suffixes that are part of words.

Stemming is a rule-based Normalization technique, which allows the removal of inflections forms in words. For example,

*"jumping" "jumps" "jumped"* are all inflection forms of the same stem word "jump". But as one would expect, a rule-based normalization technique is not a solution for all scenarios, and hence stemming falls short with certain words.

### Lemmatization

Lemmatization, on the other hand, is a systematic normalization process, in which the identification of root words is based on vocabulary, word structure, and other grammar rules. This provides much better identification of root words compared to stemming.

For example,

*Running, ran, runs -> Run*&#x20;

*Eating, eats eaten -> eat*

### POS Tagging

Tagging refers to the process of attaching descriptors to each token. POS Tagging or Part of Speech Taggings, refers to the process of any one of the parts of speech to the given words in a corpus. This helps in capturing syntactic relations between words. The common Parts of speech tags includes "noun", "verbs", "adjective", "adverbs", "pronoun", "conjunction" etc.

Let us consider an example set of tokens from the following sentence.

> "She" "sells" "seashells" "on" "the" "seashore".

Here, the POS tagging would give us the following result,

"She" : Pronoun "Sells" : Verb "Seashells" : Noun "on" : Preposition "the" : determiner "seashore" : Noun

Of course, the words such as "on" and "the" could be removed as a part of "Stop Words Removal", but it made more sense to use them in this example for a sense of completion.

### Named Entity Recognition

Named Entity Recognition or NER is the process of identifying entities in a text and classifying them into well-known categories. This helps in identifying key elements in the text. Some of the common categories used include

* People
* Location
* Organization
* Quantity
* Time
* Money
* Work of Art
* Percent
* Event
* Product Let us consider an example sentence

> *"Sachin Tendulkar was born in Mumbai in 1973."*

The Named Entities recognized in the sentence are

"Sachin Tendulkar" - Perosn "Mumbai" - Location "1973" - Time


# Word Embeddings

Meanings are multi-dimensional, son.

![](https://2566128011-files.gitbook.io/~/files/v0/b/gitbook-x-prod.appspot.com/o/spaces%2FUn1oKrw7P8P5qiTjWXjv%2Fuploads%2FtSYlVOMVWPBwFGeZ2MGL%2Ftitle.png?alt=media\&token=fb23a29d-e44b-40ea-887d-fa15df27e1e2)

In the previous sections, we have seen how the *Preprocessing Pipeline* enables us to normalize the large corpus and tagged meta information to individual words. But what does this random group of words mean? How does the machine understand the semantic information associated with the words/sentences?

Words or Text have little meaning to machine learning applications. The first step towards understanding the semantic information associated with the text would be to convert the text to a numerical representation, preferably vectors.

## One-Hot Encoding

One of the easiest ways to convert text to numbers is using One-Hot Encoding. One-Hot encoding is a vector representation of all the words in the corpus. In other words, every word appearing in the corpus is represented as a vector consisting of 1s and 0s. This allows a unique representation of every unique word in the vocabulary.

The size of the vector depends on the size of the Vocabulary. If the vocabulary contains 'n-words, then each word would be represented by an n-sized vector. To understand it better, let us consider an example sentence.

> > "the cat sat on the mat"

The unique words in the text constitute our vocabulary. These could be encoded into a 5-size (number of unique words in vocabulary) vector.

| the | cat | sat | on | mat |
| --- | --- | --- | -- | --- |
| 1   | 0   | 0   | 0  | 0   |
| 0   | 1   | 0   | 0  | 0   |
| 0   | 0   | 1   | 0  | 0   |
| 0   | 0   | 0   | 1  | 0   |
| 0   | 0   | 0   | 0  | 1   |

Once we define the unique words in the vocabulary, we could convert the sentence into the following

```
[10000] 
[01000] 
[00100] 
[00010] 
[10000] 
[00001]
```

While this does convert the text into numerical representation, it does comprise of few issues.

* As One-Hot encoding uses a sparse vector whose size matches the size of vocabulary, computation costs would be higher when processing a large corpus.
* It fails to capture contextual and semantic information of the words.

Some of the other alternatives are *Bag Of Words* and *Tf-Idf*, but these two are quite limited. The alternative is to use Word Embeddings.

## Word Embeddings

Word Embeddings is one the most popular approaches in representing text as numbers when processing a large corpus. It is capable of preserving the syntactic and semantic information of the word along with the context. Word Embeddings is a learned vector representation of text where words with the same or similar meaning have similar representation and are placed closely in a vector space. The key goals of word embeddings could be outlined as

* Reduce dimensionality
* Capture context information
* Ensure similar words have similar representation.

![](https://2566128011-files.gitbook.io/~/files/v0/b/gitbook-x-prod.appspot.com/o/spaces%2FUn1oKrw7P8P5qiTjWXjv%2Fuploads%2F2pJophpie7ZqAYdG3roi%2Fword-embeddings-high-resolution.png?alt=media\&token=6246c895-041e-4a11-80c0-fe52b1347705)

Word embeddings are useful in

* Computing similar words
* Feature Generation
* Document Clustering
* Text Classification
* Natural Language processing

Before we delve into common Word Embedding techniques used, let us take a moment to understand the importance of context. In natural language, the meaning of a word, most often than not, could be inferred by the surrounding words. This makes it possible to predict the target word using surrounding words or vice versa.

### Word2Vec

![](https://2566128011-files.gitbook.io/~/files/v0/b/gitbook-x-prod.appspot.com/o/spaces%2FUn1oKrw7P8P5qiTjWXjv%2Fuploads%2F30RBIwOXZpQET82B16OZ%2Fword2vec.jpg?alt=media\&token=487a7fd2-654e-464e-8479-dad08b2edc86)

Word2Vec is one of the ways to create efficient word embeddings using a neural network from a large corpus. Word2vec accepts an input of a large corpus and creates an output of feature vectors which efficiently represents the words in the corpus. The model is efficient in detecting synonymous words and completing partial sentences due to its ability to capture word associations.

> > Level of semantic similarity of words can be represented using cosine similarity between vectors.

Word2Vec relies on a two-layer neural network for parsing and processing the large corpus and producing vector representations. It is a self supervisor learning neural network, which trains itself on a large corpus. If during the training phase, the prediction turns out to be incorrect, then the errors are backpropagated to adjust the associated weights.

Word2Vec is not a single algorithm, instead, it is a group of related models that used to produce word embeddings and was first published by Tomas Mikolov at Google in 2013. The core idea behind the Word2Vec approach is to extract features of a word.

#### **Feature Vector**

A feature is a measurable property that can describe a particular characteristic of an object efficiently. The feature vector is an n-dimensional numerical vector that describes the features of a word. To understand it better, let us consider an analogy.

Given two houses, how do you compare them? One way would be to compare the features of the houses to one another - size of the house, number of bedrooms, size of the kitchen, etc. This is what the feature vector does intents to support. Each word in the vocabulary is represented by a vector, which denotes a *score* for the word based on a collection of features.

Let us consider the following collection of words

> \[king, horse, queen, man, woman]

The feature matrix could look like

|              | king | horse | queen | man | woman |
| ------------ | ---- | ----- | ----- | --- | ----- |
| royality     | 1    | 0     | 1     | 0   | 0     |
| authority    | 1    | 0     | 0.9   | 0.2 | 0.2   |
| gender       | -1   | 1     | 1     | -1  | 1     |
| has\_4\_legs | 0    | 1     | 0     | 0   | 0     |
| is\_rich     | 1    | 0     | 1     | 0.3 | 0.2   |

With this set of features, we can easily understand that king and queen are closely related words, and so are men and women. We could go one step ahead and use words to derive other words. For example

| king | - | man | + | woman | \~ | queen |
| ---- | - | --- | - | ----- | -- | ----- |
| 1    |   | 1   |   | 0     |    | 1     |
| 1    |   | 0.2 |   | 0.2   |    | 0.9   |
| -1   |   | -1  |   | 1     |    | 1     |
| 0    |   | 0   |   | 0     |    | 0     |
| 1    |   | 0.3 |   | 0.2   |    | 1     |

As you can observe, doing mathematical operations on the vector representation of king, man and woman give you a value that is almost equivalent to a queen. This provides tremendous capabilities in understanding the relationship between words and inferring them.

In real life, the list of features is not hand-coded and is unknown to the developer. The neural network takes responsibility for it.

The two common techniques used in word2vec are

* CBOW
* Skip-gram

In both approaches, the training relies on creating a *fake problem* to train the neural network. The fake problem in both cases would be to use the given word(s) to predict the missing word in the training window.

### CBOW (Continunous Bag of Words)

The continuous bag of words relies on iterating over the sentences (sliding the window of size-n) and using the context words (one-hot representation) to predict the target word. In other words, the *fake problem*, in this case, would be to use the context words to predict the target.

![](https://2566128011-files.gitbook.io/~/files/v0/b/gitbook-x-prod.appspot.com/o/spaces%2FUn1oKrw7P8P5qiTjWXjv%2Fuploads%2Fid1yyLqKZ8f39lsGMXNt%2FCbow.jpg?alt=media\&token=66ce70eb-3ce9-4b9e-bf24-37f8928a5db0)

Consider the following example.

> *"jia brought a box of sweets for her sister"*

In the example, with a selected window size of 3, the first two words are used as input to predict the target word. Running the fake problem on the sentence and training the neural network would result in a training set that is similar to the following.

| context   | target  |
| --------- | ------- |
| a, box    | brought |
| brought,a | jia     |
| ..,..     | ..      |
| ..,..     | ..      |

With a larger corpus, the training set could cover a larger span of vocabulary and hence would be able to predict a lot more words.

### Skip-gram

In skip-gram approach uses the distributed representation of input words to predict the context. The fake problem, in this case, is to predict the context words to predict the target word.

![](https://2566128011-files.gitbook.io/~/files/v0/b/gitbook-x-prod.appspot.com/o/spaces%2FUn1oKrw7P8P5qiTjWXjv%2Fuploads%2Fe7WMCZHcHdDToYkL5HjY%2FSkipgram.jpg?alt=media\&token=8ffbd71c-2149-4ce6-9c31-7905faf8e396)

For example, consider the following sentence.

> *"naina thanked her sister for box of sweets"*

In the example, similar to CBOW we would use a window of words. Again for this example, let us assume the window size is 3. In the case of skip-gram, we would use the target word to predict the context words. This would produce a training set as the following.

| target  | context     |
| ------- | ----------- |
| naina   | thanked,her |
| thanked | her,sister  |
| ..      | ..,..       |
| ..      | ..,..       |

{% hint style="info" %}
Dhee.Ai uses Skip-gram Word2vec, fastext and BERT vectors for word embedding in its different modules. \
\
108 dimensional vectors are used by Dhee for optimal performance and accuracy of its semantic analysis routines.
{% endhint %}


# Textual Entailment

Have you wondered how a Question-Answering system could detect different variants of the same question and still provide you the same answer?

![](https://2566128011-files.gitbook.io/~/files/v0/b/gitbook-x-prod.appspot.com/o/spaces%2FUn1oKrw7P8P5qiTjWXjv%2Fuploads%2FjsP8Hn8UBddkzXx1ugCP%2Fconcepts.entailment.title.png?alt=media\&token=4ea0af7b-0f2e-496a-85a3-b5f53a8bc6db)

One of the key challenges faced by NLP systems is the concern of semantic variability. Think about it for a moment. How often can the same expression be expressed in different ways in human languages? Person A might express the same meaning with a text that comprises completely different words than a sentence formed by another Person B.

The secret sauce lies in recognizing textual entailment.

### Textual Entailment

Textual Entailment helps in identifying the relationship between two sentences, or in other words, the semantic variability of the expression. The generic task of *Recognizing Textual Entailment (RTE)* can be specified, given two texts, whether the meaning of one text can be inferred or entailed from the other.

In the RTE domain, we treat one of the given text content as *text or premise* and the other as *hypothesis*. The task of the RTE would be to verify the *hypothesis* entails the *premise*.

Let us consider the following pair of premises and hypotheses.

*"Nikita knows how to swim"*. *"Nikita cleared her swimming test*".

In the above example, the inference relation in Entailment is unidirectional, ie, from *premise to hypothesis*. The relation could be *bidirectional* as well. Let us consider another example.

*"Nikita undertook her swimming test today and cleared it"*. *"Nikita knows how to swim"*.

RTE finds different applications in various fields. Let us examine a few.

**Question Answering System**

The Question Answering system aims to provide answers for questions posed in natural languages. As one would expect, questions would have similar meanings despite the difference in the semantics. Similarly, the answer itself could be formulated using different words and expressions compared to the question.

Considering these challenges, the role of RTE in a Question Answering System is to identify texts that entail the expected answer.

**Information Extraction**

Information Extraction systems focus on identifying relations among the elements in the text. Consider the following examples,

*The house is owned by Aami* *Aami bought a new house*

In the given examples, the entities involved are *Aami* and *house*. The relation is the person *Aami* "owns" the *house*. In the context of Information Extraction, the role of RTE is to differentiate text variants that express the same target relations.

**Information Retrieval**

While *Information Retrieval* may sound similar to *Information Extraction*, the roles executed by *Information Retrieval* systems are different. The role of the information retrieval systems is to retrieve documents in response to the given search query.

For Information Retrieval Systems, the RTE task ensures a relevant document is retrieved despite the presence or absence of query tokens.

**Document Summarization**

Document Summarization enables to avoid redundancy in text segment compared to another text segment in the same document. The task of RTE is to omit a redundant sentence or expression from the summary that could be entailed from another expression in the summary.

### Approaches

The different approaches for recognizing textual entailment can be classified into two broad categories based on the representation of the involved premise and hypothesis.

In the first approach, the premise and hypothesis can be represented using lexical methods. The lexical approach works on the strings comparisons. While the approach does consider word overlapping and subsequence mapping, it ignores the semantic relationships between the words.

The alternative approach is using syntactic methods. The syntactical methods focus on representing the involved text fragments using directed graphs. The directed graphs approach allows the text fragments to maintain the relationship. The entailment relationship can be determined by comparing the graph representation of premise and hypothesis.

The entailment relationship is often represented using a numeric value. This enables to portray the degree of entailment, instead of having a true/false value. Running deep learning models on a large corpus enables to discover a lot of features that could be useful in the entailment task.


# User Intent Recognition

Deep Neural Networks can be attentive too..

Detecting User's intent is very crucial in driving the conversations in a dialog system in the right direction. In simple words intent recognition engine classifies user utterance to one of the target class/intent.&#x20;

![](https://2566128011-files.gitbook.io/~/files/v0/b/gitbook-x-prod.appspot.com/o/spaces%2FUn1oKrw7P8P5qiTjWXjv%2Fuploads%2FU2pHSxgIkQbnDgsVOzhn%2Fuir.key.png?alt=media\&token=a5c1424a-da2c-41e9-b78d-2f1649eb9f40)

#### **Components of Intent Recognition Engine**

1. Multilingual Transformer based Language Model

   This component converts input sentence/words to contextual embeddings, by contextual we mean the same word in different contexts would end up getting different embeddings, this contextuality also helps in dealing with homographs. The words in an utterance are tokenized using a sub-word tokenizer (more about this in the next section), these token's id's traverse through the domain fine tuned Language models to output 768-dimensional word vectors. various pooling techniques can be employed to convert these high dimensional word vectors into sentence embeddings.
2. Convolutional Neural Network (CNN) based classifier

   The embeddings extracted from a Domain Adapted Language Model is used to train a CNN classifier

![intent-recognition engine](https://2566128011-files.gitbook.io/~/files/v0/b/gitbook-x-prod.appspot.com/o/spaces%2FUn1oKrw7P8P5qiTjWXjv%2Fuploads%2FPnC7xx00A4pRHEdG4N79%2Fintent-recognition.jpg?alt=media\&token=5e637e31-5fa9-46f3-838f-89053743f383)


# Document Reading

I'm a bot. Documents are not boring for me!

Neural Document reading is a task where a Deep learning Model finds an answer to a query from a document/context.&#x20;

Components of Document Reader

1. Elastic Search as a Document store

   The documents are preprocessed and are stored in elastic search indexes
2. Neural/statistical Document Ranker

   Document Ranker retrieves Top n documents out of m documents (m>>n) which would most likely have an answer for the incoming query. The most likely documents that would contain answer are chosen based on:&#x20;

   * Neural approach: Semantic similarity of query embedding with the already existing Document embeddings&#x20;
   * Statistical approach: Based on word overlap in question to that of document
3. Transformer Reader
   * Extractive Reader

     we feed question and context (the list of documents shortlisted by the document ranker) as input to Transformer. The Embeddings generated from the transformer layers are passed through two separate Feed-Forward neural networks. One of the Networks predicts the start token index and the other predicts the end Token index. The Probability distribution over the words in documents (for both start and end token) is used to retrieve the answer
   * Generative Reader

     Generates a novel answer (not necessarily a span of text) from the document

![Document Reader](https://2566128011-files.gitbook.io/~/files/v0/b/gitbook-x-prod.appspot.com/o/spaces%2FUn1oKrw7P8P5qiTjWXjv%2Fuploads%2Fi971Bas9i0wo6nW5mNlN%2Fdocument-reading.jpg?alt=media\&token=78ec4f80-95c3-443d-a23e-f3a44236607e)


# Getting Started

Dear seeker, here is your guide.

This developer guide provides you with a walk-through on creating, training, deploying and integrating your bot in your application.&#x20;

![](https://2566128011-files.gitbook.io/~/files/v0/b/gitbook-x-prod.appspot.com/o/spaces%2FUn1oKrw7P8P5qiTjWXjv%2Fuploads%2FIhwJNaYC2dGjk324gVTx%2Fdeveloper-guide.png?alt=media\&token=9d1f7472-8260-42fe-8588-ff42e72443ea)

You can implement each of the steps detailed in the below listed pages to experience how a capable enterprise bot can be built using Dhee.AI platform.

{% content-ref url="/pages/gMAKevx0Jyb1l7x4nsSa" %}
[Train your bot](/getting-started/train-your-bot)
{% endcontent-ref %}

{% content-ref url="/pages/UYwibXjLbtnBNVjlBzm8" %}
[Train for Intent recognition](/getting-started/train-your-bot/train-for-intent-recognition)
{% endcontent-ref %}

{% content-ref url="/pages/NNKvDih8FZ2wL4jf3KH8" %}
[Configure Agent Responses](/getting-started/train-your-bot/configure-agent-responses)
{% endcontent-ref %}

{% content-ref url="/pages/47pDSf5ClrjlS7VWHlRW" %}
[Configure Endpoints](/getting-started/train-your-bot/configure-endpoints)
{% endcontent-ref %}

{% content-ref url="/pages/sVvmREKHDHEkmXmwS4JS" %}
[Configure Workflow](/getting-started/train-your-bot/configure-workflow)
{% endcontent-ref %}

{% content-ref url="/pages/L1ZMHniZN0z2DitR1w8I" %}
[Build and Deploy](/getting-started/build-and-deploy)
{% endcontent-ref %}


# Train your bot

A well trained chat bot becomes a chad bot.

Creating an conversational AI driven bot is majorly preparing and feeding the content to train it.

There are two types of content on which our bot will be trained. They are -

1. Information retrieval from static data. This can be done via
   1. Feeding raw text documents
   2. Configuring frequently asked questions
2. Understanding user's intention and catering it via by a dynamic process, called a "skill".

But to begin with, we need to create our bot project.

![](https://2566128011-files.gitbook.io/~/files/v0/b/gitbook-x-prod.appspot.com/o/spaces%2FUn1oKrw7P8P5qiTjWXjv%2Fuploads%2FfqCLPaUxllDGaBBLRR9q%2Fcreate-bot-bg.png?alt=media\&token=4b98a944-49db-4ae9-aac5-e31b8f3dc04b)

In this walk-through, we will create our first bot project, and then configure and build it to work as our leave application voice-agent.

{% content-ref url="/pages/ZwpiUmpJ6gL4BnPLRF9F" %}
[Create your bot project](/getting-started/train-your-bot/create-your-bot-project)
{% endcontent-ref %}


# Create your bot project

Even the universe started out as project.

The first step towards building a bot is to create a new Project in the [Dhee.AI](https://developer.dhee.ai/) portal. Login to our developer portal and start building your bot.

## Create  Project

The developer can use the *Manage Project* button in the dashboard to navigate to the Projects screen. Use the *Create Project* Button to create a new Project.

![Create Project](https://2566128011-files.gitbook.io/~/files/v0/b/gitbook-x-prod.appspot.com/o/spaces%2FUn1oKrw7P8P5qiTjWXjv%2Fuploads%2FFpBOLqf6peQ4ksqNEZ8u%2Fcreate-new-project.PNG?alt=media\&token=5c505565-b717-4223-b092-2bd010a736ee)

Once you have created the new project, you would be redirected to the Dashboard. Ensure that the Project selection in the drop-down is the one you desire.

![Create Project](https://2566128011-files.gitbook.io/~/files/v0/b/gitbook-x-prod.appspot.com/o/spaces%2FUn1oKrw7P8P5qiTjWXjv%2Fuploads%2FckjdsBFcp7xd8A2VfroD%2Fcreate-project-wizard-step1.PNG?alt=media\&token=4f50a873-ae26-4cf7-ae5f-dfaa9047f41e)

## Configure Bot

We will be deploying a multi-lingual bot. To enable the same, ensure your desired languages are selected using the *AgentSettings->Basic* Menu.

![Select Multiple Languages ](https://2566128011-files.gitbook.io/~/files/v0/b/gitbook-x-prod.appspot.com/o/spaces%2FUn1oKrw7P8P5qiTjWXjv%2Fuploads%2FRmKvEN1ULzLITcXUyKbW%2Fagent-setting-basic.PNG?alt=media\&token=1f725583-7166-46b7-8165-6a3bb66ead17)

We would require our bot to support voice agents. You can enable voice agents using the *AgentSettings->Voice* Menu.

![Enable Voice Agent](https://2566128011-files.gitbook.io/~/files/v0/b/gitbook-x-prod.appspot.com/o/spaces%2FUn1oKrw7P8P5qiTjWXjv%2Fuploads%2FeS4EK1zlFQLgbDIoIR6t%2Fagent-setting-voice.PNG?alt=media\&token=dacdf0a0-1282-4e65-9c14-b579a6c7ffcd)

For the sake of this example, we will keep the Bots configuration to the minimum. If you are interested in exploring the different configurations you can provide for your bot, refer to our [Configuration](broken://pages/YGskDC7cFgetKnCpkuRG) documentation.

To proceed to configure to Intends, refer to the[ Configure Intents](/getting-started/train-your-bot/train-for-intent-recognition).

### References <a href="#references" id="references"></a>

* [Manage Project](/platform-reference/manage-projects)
* [Multi-Lingual Support](/platform-reference/agent-settings/basic)
* [Enable Voice Agents](/platform-reference/agent-settings/basic/voice)
* [Agent Configurations](/platform-reference/agent-settings/basic)


# Train for Intent recognition

An intent precedes every work in the world.

In the previous section, you have created a new Project and configured the basic configuration for your bot. In this section, we will continue configuring our Bot, especially the Intents.

![](https://2566128011-files.gitbook.io/~/files/v0/b/gitbook-x-prod.appspot.com/o/spaces%2FUn1oKrw7P8P5qiTjWXjv%2Fuploads%2FoZkNvBvY6K0NVkGDwe7I%2Fintent-leave-sketch.png?alt=media\&token=d582b98c-375b-4b97-839c-d9fe995d4eff)

### Intents

Intents define the goals the Customer wants to achieve when he/she interacts with our bot.

The intent definition should include the triggers which help in identifying the intent during the conversation with the Customer. Once an intent is identified by the chatbot, the intent definition should be complete with the information (entities) it needs to have for completing the action. You can read more on [Intents and Automation](/platform-reference/intents-and-automation) in our documentation.

{% hint style="info" %}
Intents are used to define what you want a bot to respond with when it picks up the intention of a user, or when you want to trigger a response based on some other event.  In other words, it describes the intention and the expected interaction user would want from the chatbot.
{% endhint %}

We will go ahead and create our first intent *applyLeave*, which would describe the intent of the user to apply for leave. Each intent is characterized by a few features.

* **Intent Name** : *Unique identifier for the intent.*
* **Description** : *Description for the intent.*
* I**s Top Level** : *Specifies if the intent is a top-level intent or not.*
* **Action** : *Comprises of Slots, Triggers and Stop Triggers.*

![Intents & Automations](https://2566128011-files.gitbook.io/~/files/v0/b/gitbook-x-prod.appspot.com/o/spaces%2FUn1oKrw7P8P5qiTjWXjv%2Fuploads%2FtGWExifzRz1IyvrDqfiM%2Fcreate-intent.JPG?alt=media\&token=e21bceff-5ff0-4723-a686-e7fd61d0a37b)

As seen in the image, we have set the *Intent Name* as *applyLeave*. Henceforth, we would be referring to this intent when we specify *applyLeave*. We will now proceed to describe the *Action* parameters associated with the intent.

{% content-ref url="/pages/bHG42NUkr6N5rJ7FpEi0" %}
[Define the Slots](/getting-started/train-your-bot/train-for-intent-recognition/define-the-slots)
{% endcontent-ref %}

{% content-ref url="/pages/iOUD4MbklHRdDhbigQlY" %}
[Train the Triggers](/getting-started/train-your-bot/train-for-intent-recognition/train-the-triggers)
{% endcontent-ref %}

{% content-ref url="/pages/jVhd5UzehEBrnFEzkwxi" %}
[Train for Stop-Triggers](/getting-started/train-your-bot/train-for-intent-recognition/train-for-stop-triggers)
{% endcontent-ref %}


# Define the Slots

Right information falling into a wrong slot becomes misinformation.

Slots describe the *input* and *output* fields associated with the intents, which are used for processing the intent. These might also include the inputs for the Web Api requests, if any, associated with the intent. You can define the Slots by using the *slot* button under the *Action* column. You can read more on *Slots* in our configuration section on Slots.

![](https://2566128011-files.gitbook.io/~/files/v0/b/gitbook-x-prod.appspot.com/o/spaces%2FUn1oKrw7P8P5qiTjWXjv%2Fuploads%2FtGWExifzRz1IyvrDqfiM%2Fcreate-intent.JPG?alt=media\&token=e21bceff-5ff0-4723-a686-e7fd61d0a37b)

## Define Slots

In our example case of *applyLeave*, we would need three inputs, for which we will create slots.

* startDate
* endDate
* leaveReason

![Slots](https://2566128011-files.gitbook.io/~/files/v0/b/gitbook-x-prod.appspot.com/o/spaces%2FUn1oKrw7P8P5qiTjWXjv%2Fuploads%2FpsdnTNw8726gpXeJdgJp%2Fslots.JPG?alt=media\&token=73bb1661-ea8a-41cc-9863-af3701019ae1)

The *startDate* and *endDate* are of Date type. The *leaveReason* is a custom type, which would specify the type of leave. We will get to that in a bit. Before that, let us complete the definition of *startDate* and *endDate*.

### Templates

![Templates for startDate and endDate](https://2566128011-files.gitbook.io/~/files/v0/b/gitbook-x-prod.appspot.com/o/spaces%2FUn1oKrw7P8P5qiTjWXjv%2Fuploads%2FbJzNMm01zWHV23U3Gl8t%2Fslot-templates.JPG?alt=media\&token=8ad52e00-2746-46b1-b193-2f210d582fea)

We can use the *Templates* to read multiple inputs together from user utterances. For example, for the *startDate*, we can define the template as "*leaves from ${startDate} to ${endDate}*". This would ensure the *startDate* and *endDate* are filled when the user utterance is similar to any of the following.

```
 "I need a leave from 20th of feb till 24th "
 "I need a leave from tomorrow till 24th "
```

The Templates can be instructed to support multilingual functionality if the bot was designed to the multilingual. You can enable the functionality by using the *Auto-translate* flag.

### Prompts

![Prompt for startDate](https://2566128011-files.gitbook.io/~/files/v0/b/gitbook-x-prod.appspot.com/o/spaces%2FUn1oKrw7P8P5qiTjWXjv%2Fuploads%2FmQaeWPLW6gpmX23typs3%2Fslot-prompts.JPG?alt=media\&token=79a7fbc8-869c-4da8-9c6f-8a2f97a49549)

In addition, you can also define *Prompts* for each of the slots if the User fails to provide the required inputs. These are the messages which the chatbot would ask the user when there is missing information. For example, for the *startDate* the prompt could be defined as

```
From when are you planning to go on leave?
```

Similarly, the prompt for *endDate* could be

```
O.K. till when ?
```

![Prompt for endDate ](https://2566128011-files.gitbook.io/~/files/v0/b/gitbook-x-prod.appspot.com/o/spaces%2FUn1oKrw7P8P5qiTjWXjv%2Fuploads%2FnP2xdctrL4IvepVVxJTf%2Fslot-prompts_endDate.JPG?alt=media\&token=6f8c9f4a-872d-48f9-9675-b1578784b8db)

## Define Custom Type Slots

Until now we have created slots using system-defined types. We will now proceed to create a Custom Data Type to describe the type of *leave* and create a slot using the same data type. We will use the *Entities & Other Data -> Custom Entity Types* for defining the custom entity.

![Custom Entity Type](https://2566128011-files.gitbook.io/~/files/v0/b/gitbook-x-prod.appspot.com/o/spaces%2FUn1oKrw7P8P5qiTjWXjv%2Fuploads%2F8nIk2OTvlsBqHk8UlsrZ%2Fentities-custom-entity-type.JPG?alt=media\&token=4148567b-7e55-43ce-8fcd-540081ef5b77)

As seen in the image, we have created a Custom entity, *leaveReason* which would describe the reason for the leave applied. We will now proceed to define the slot using Custom Type.

![Slot using Custom Entity Type](https://2566128011-files.gitbook.io/~/files/v0/b/gitbook-x-prod.appspot.com/o/spaces%2FUn1oKrw7P8P5qiTjWXjv%2Fuploads%2FZWnc679IIQiSIa6Trn9I%2Fslots.JPG?alt=media\&token=d066683d-3ed3-44ac-b610-7b2c90081893)

The \_Slot Type \_ for the *leaveReason* slot is *Custom*. The *Custom Entity Type* allows you to select the custom entity you have defined in the previous step. Once again, we can use the *templates* to identify the *leaveReason* values from user utterances. For example

```
I'm not well ==> Medical
```

We could also *prompt* the user for specifying the reason for leave application if he doesn't specify it himself. We could use custom values for prompts. For example,

```
OK. Why do you want the leave ? [[EXT:BUTTON|Medical|Casual]]
```

This would show a prompt including the possible reasons for leave as shown in the image below.

![Prompt using predefined values](https://2566128011-files.gitbook.io/~/files/v0/b/gitbook-x-prod.appspot.com/o/spaces%2FUn1oKrw7P8P5qiTjWXjv%2Fuploads%2FDVHMk7QB7LwT99OgKY3K%2Fprompt-leave-reason.JPG?alt=media\&token=81c44fb1-2bb7-4c14-a292-3cdfda32782c)

We will now proceed to define the triggers.


# Train the Triggers

A bot when triggered, does the good work.

In the previous section, we configured the different inputs/outputs that are associated with the intent. The next step is to define *triggers* which would help the *agent* to identify the intent to use from the User utterances.

To add triggers, select the *Trigger* button under the *Action*.

![Select Trigger](https://2566128011-files.gitbook.io/~/files/v0/b/gitbook-x-prod.appspot.com/o/spaces%2FUn1oKrw7P8P5qiTjWXjv%2Fuploads%2FtGWExifzRz1IyvrDqfiM%2Fcreate-intent.JPG?alt=media\&token=e21bceff-5ff0-4723-a686-e7fd61d0a37b)

Triggers allow you to define a collection of sentences or phrases which would be considered as a trigger for the intent. These could be explicit statements that help identify the intents or could be indirect references. For example, for the *applyLeave* intent, the user can interact with the chatbot in any of the following ways.

```
i need a leave
i am sick
I am planning some time off
```

You can also select to *auto translate* the texts to support a multilingual chatbot.

![Triggers for applyLeave](https://2566128011-files.gitbook.io/~/files/v0/b/gitbook-x-prod.appspot.com/o/spaces%2FUn1oKrw7P8P5qiTjWXjv%2Fuploads%2FVKlGsf6TbhGwwaFxjQau%2Fintent-trigger.JPG?alt=media\&token=58b52466-5c09-458f-8d3d-9f9e2d9c5bca)

Each of the above states different ways a user might interact with the chatbot about the need for taking a day off. If the chatbot detects any of these, it would recognize the intent that needs to be considered as *applyLeave*.

![Chatbot recognizes the intent using trigger](https://2566128011-files.gitbook.io/~/files/v0/b/gitbook-x-prod.appspot.com/o/spaces%2FUn1oKrw7P8P5qiTjWXjv%2Fuploads%2FRJ5m65hPOAsbo0mRAvnO%2Fintent-trigger-indirect.JPG?alt=media\&token=d98c345e-eefb-48c6-95ac-fdd01471c081)


# Train for Stop-Triggers

Now how do I stop the bot from firing that missile?

*Stop triggers* are words or phrases that direct the chatbot to cancel the intent. These are helpful to cancel the current intent in mid-ways. You can configure the stop triggers using the *Stop Trigger* button under *Action*.

![Select StopTrigger](https://2566128011-files.gitbook.io/~/files/v0/b/gitbook-x-prod.appspot.com/o/spaces%2FUn1oKrw7P8P5qiTjWXjv%2Fuploads%2FtGWExifzRz1IyvrDqfiM%2Fcreate-intent.JPG?alt=media\&token=e21bceff-5ff0-4723-a686-e7fd61d0a37b)

In the example *applyLeave*, the following is one possibility of how the user might ask the chatbot to cancel the leave application process.

```
i will take leave later
```

![](https://2566128011-files.gitbook.io/~/files/v0/b/gitbook-x-prod.appspot.com/o/spaces%2FUn1oKrw7P8P5qiTjWXjv%2Fuploads%2FsWpA0fmQYx09BrccIHMG%2Fintent-stop-trigger-ui.JPG?alt=media\&token=14ba1364-0ef8-4501-a9ec-b6452ddaae0e)

As with *triggers* the *stop triggers* can also support *auto translation* for multilingual chatbots.

Once the Stop Triggers are configured, the user can cancel the intent midway if he utters any of the configured stop triggers.


# Configure Agent Responses

What responds sensibly is an agent - expert opinion.

Once the Agent completes the actions required to fulfill the intent, it needs to respond to the user and convey the same.&#x20;

![](https://2566128011-files.gitbook.io/~/files/v0/b/gitbook-x-prod.appspot.com/o/spaces%2FUn1oKrw7P8P5qiTjWXjv%2Fuploads%2FxFZlWbqEP1YLHrZCBguw%2Fdeveloper-guide-intent-agent-response.png?alt=media\&token=7b94f66a-cad8-4b5d-ae43-514cdbb99b90)

The response can be configured using the *EntitiesAndData->AgentResponses->MultilingualResponses* section.

![Configure User Response](https://2566128011-files.gitbook.io/~/files/v0/b/gitbook-x-prod.appspot.com/o/spaces%2FUn1oKrw7P8P5qiTjWXjv%2Fuploads%2FEmoGV4fVnbCQ5gWLcIQz%2Fconfigure-agent-response.JPG?alt=media\&token=aa71cbb5-12b4-4339-a50a-43da1c2464a8)

Each response is uniquely identified by a *Code*, which is a unique string to identify it. The *Text* property defines the actual response the chat agent provides. The *Agent Response* supports auto-translations which can be opted in by turning on the *Auto Translate* flag when working with a multi-lingual agent.

In our example, we have defined a response *leaveRegisteredMLT* that allows the chatbot to respond to User once the *applyLeave* intent is complete with the following text.

```
We have let your managers know about your leave. You shall get an email when they approve !
```


# Write your REST Endpoints

A good REST makes every tech stack work efficiently.

Now assume you have a HRM application which does the book keeping of your employees' leaves. How does your bot update the leave information it understood from your employee during a conversation to your HRM ?

Here's where Dhee's adaptor APIs come to use.

The adaptor APIs are called by your Dhee.AI bot at the right phase of a conversation to communicate information back and forth with your existing back-end systems. These adaptor APIs have to be REST based endpoints exposed to the internet, secured, and authorised using Basic Authentication.

Also, they are called "adaptor" APIs, because they consume and produce data in the format prescribed by Dhee.AI, and encapsulates all the enterprise API calls, data accumulation from different sources, and any post processing if required, within them.

In this part of the walk-through, we will develop sample REST-based endpoints which would be later consumed by our clients/bots application. As discussed earlier, the walk-through has been designed based on an imaginary leave management system.

In the beginning, we will keep the endpoints as simple as possible. We will expose two end-points, one each for

* **RetrieveCasualLeaveStatus** - Retrieves the total and remaining Casual leaves.
* **RetrieveSickLeaveStatus** - Retrieves the total and remaining Sick leaves.
* **RaiseLeaveRequest** - Raise a leave request for the specified category during the mentioned period.

### API Endpoint <a href="#api-endpoint" id="api-endpoint"></a>

In this example, we will use Azure Functions to create end-points. Azure Functions serverless compute service which can be scaled on-demand. It frees the developer from maintaining the server infrastructure, configurations, or even web server. We would be using C#.Net as our primary language for developing the example endpoints. But note that choice of programming language is not important here.

### API Response Format <a href="#api-response-format" id="api-response-format"></a>

The Dhee.AI requires the API endpoints to follow a fixed schema so that it can decipher the responses efficiently. The schema of the response object is defined as follows

```
{
  "$schema": "http://json-schema.org/draft-04/schema#",
  "type": "object",
  "properties": {
    "success": {
      "type": "boolean"
    },
    "result": {
      "type": "object"
    },
    "resetList": {
      "type": "array",
      "items": {}
    },
    "errorMessageKey": {
      "type": "string"
    }
  },
  "required": [
    "success",
    "result",
    "resetList",
    "errorMessageKey"
  ]
}
```

For example,

```
{
    success : true,
    result : {
                slotName01 : "value01",
                slotName02 : "value02",
                slotNameN  : "valueN"
            },
    resetList : ["slotToBeEmptied01", "slotToBeEmptied02", "slotToBeEmptiedN"],
    errorMessageKey : "errorMessageMLTIfAny"
}
```

Considering the format, let us go ahead and define our `DheeResponse` Dto.

```csharp
public class DheeResponseDto
{
    public bool Success { get; set; }
    public Dictionary<string,object> Result { get; set; }
    public IEnumerable<string> ResetList { get; set; }
    public string ErrorMessageKey { get; set; }
}
```

As mentioned earlier, we will keep the implementation as simple as possible in this state of development. The example Azure functions would not persist data and would use mock data for responding to User requests.

**RetrieveCasualLeaveStatusStatus**

The first endpoint we would be developing is the **RetrieveCasualLeaveStatus**. The method returns the original number of casual leaves available for the person and the remaining ones. With C#, you can define the Azure Function as the following.

```csharp
[FunctionName(nameof(RetrieveCasualLeaveStatus))]
public static IActionResult RetrieveCasualLeaveStatus([HttpTrigger(AuthorizationLevel.Anonymous,
"POST",Route = null)] HttpRequest request,
ILogger logger)
{
    logger.LogInformation("Requesting for leave status");
    var random = new Random();

    // Mock the leave status
    var leaves = new CasualLeaveStatus
    {
        TotalLeaves = 20,
        Remaining = random.Next(0, 20),
    };

    return new OkObjectResult(new DheeResponseDto<CasualLeaveStatus>
    {
        Success = true,
        Result = leaves,
        ErrorMessageKey = String.Empty,
        ResetList = Enumerable.Empty<string>()
    }) ;
}
```

The `CasualLeaveStatus` Status is defined as

```csharp
public interface ILeaveStatus
{
    int TotalLeaves { get; set; }
    int Remaining { get; set; }
}

public class CasualLeaveStatus : ILeaveStatus
{
    [JsonProperty("casual_leave_total")]
    public int TotalLeaves { get; set; }

    [JsonProperty("casual_leave_remaining")]
    public int Remaining { get; set; }
}

public class SickLeaveStatus : ILeaveStatus
{
    [JsonProperty("sick_leave_total")]
    public int TotalLeaves { get; set; }

    [JsonProperty("sick_leave_remaining")]
    public int Remaining { get; set; }
}
```

**RetrieveSickLeaveStatusStatus**

The *RetrieveSickLeaveStatusStatus* API is quite similar to *RetrieveCasualLeaveStatusStatus* in terms of sample implementation.

```csharp
[FunctionName(nameof(RetrieveSickLeaveStatus))]
public static IActionResult RetrieveSickLeaveStatus([HttpTrigger(AuthorizationLevel.Anonymous,
"POST",Route = null)] HttpRequest request,
ILogger logger)
{
    logger.LogInformation("Requesting for leave status");
    var random = new Random();

    // Mock the leave status
    var leaves = new SickLeaveStatus
    {
        TotalLeaves = 20,
        Remaining = random.Next(0, 20),
    };

    return new OkObjectResult(new DheeResponseDto<SickLeaveStatus>
    {
        Success = true,
        Result = leaves,
        ErrorMessageKey = String.Empty,
        ResetList = Enumerable.Empty<string>()
    });
}
```

**RaiseLeaveRequest**

The third endpoint we would develop is the **RaiseLeaveRequest** endpoint. The purpose of the endpoint would be to create a leave request for the User for the specified Date Period.

Definition of the endpoint using C# is shown below.

```csharp
[FunctionName(nameof(RequestLeave))]
public static async Task<IActionResult> RequestLeave(
    [HttpTrigger(AuthorizationLevel.Function, "POST", Route = null)] HttpRequest request,
    ILogger logger)
{
    logger.LogInformation("Parsing Leave Request Information");

    var data = new
    {
        StartDate = DateTime.Parse(request.Query["startDate"]),
        EndDate = DateTime.Parse(request.Query["endDate"]),
        Reason = request.Query["leaveReason"]
    };

    logger.LogInformation($"Marking {data.Reason} Leave from {data.StartDate} to {data.EndDate}");

    return new OkObjectResult(new DheeResponseDto<LeaveRequestResponse>
    {
        Success = true,
        Result = new LeaveRequestResponse { IsRequested = true},
        ErrorMessageKey = String.Empty,
        ResetList = Enumerable.Empty<string>()
    });
}

internal class LeaveRequestResponse
{
    [JsonProperty("is_requested")]
    public bool IsRequested { get; set; }
}
```

Note that the input slots are query string parameters on a POST request. This is how dhee.ai would be sending the slot information to the endpoints.

As mentioned earlier, our API endpoints have been the simplified definition for the sake of this example. We have intentionally skipped any layer of persistence or exception handling. We will address these in the following walkthroughs.

This brings us to the conclusion of the first step. We will now use the Dhee.AI portal to configure our Bot.

{% hint style="info" %}
You can now download the complete source code for the demo API described in this example.&#x20;
{% endhint %}

{% file src="/files/5isMPWc7fnCmnGVthP3M" %}


# Configure Endpoints

Tell Dhee about your tech stack's REST. She will make it work.

In the example we are working on, we would like the chatbot to interact with our leave management system to apply for the leave on behalf of the user. For this, it needs to interact with an API Endpoint ( or a spreadsheet) to *\_mark\_* the leave application with the details provided by the user.

\
The *\_endpoints\_* need to be defined and registered with the Dhee.AI system before being consumed by our workflow. This could be done using the *\_IntentsAndAutomation->BackendAPI\_* section.

![Configure endpintso](https://2566128011-files.gitbook.io/~/files/v0/b/gitbook-x-prod.appspot.com/o/spaces%2FUn1oKrw7P8P5qiTjWXjv%2Fuploads%2FhEg3QvcP0kmlujRIVv4Q%2Fconfigure-api.JPG?alt=media\&token=e8ecc1d8-72f2-4be6-978d-4292541e54cf)

Use the '+' Button to register a new endpoint. You would be required to provide

* **Url Name** : *An unique string to identify the endpoint.*
* **Uri** : *The actual Uri of endpoint*
* **Username** : *Username to use to access the Uri*
* **Password** : *Password to use to access the Uri.*


# Configure Workflow

A task at a time, moves mountains.

So far we have defined our intents and related parameters including the slots and triggers. Now we will proceed towards defining the set of actions that need to be done for a given intent. For example, once the *applyLeave* intent has been identified and the required parameters (startDate, endDate, and leaveReason) have been collected, the chatbot is required to do necessary action to ensure the leave is applied for the user. The action or rather the set of actions that need to be carried to successfully complete an intent is defined in the *IntentsAndAutomation->Skills/DSM* section.

![](https://2566128011-files.gitbook.io/~/files/v0/b/gitbook-x-prod.appspot.com/o/spaces%2FUn1oKrw7P8P5qiTjWXjv%2Fuploads%2FQ9ah5OTbRSzFrdqBLDYd%2Fdeveloper-guide-workflow-sketch.png?alt=media\&token=01f8834b-951b-46aa-9b48-82b61e817c6c)

There are two approaches to define the workflow or set of actions that need to taken to complete the intent

* Using *Dialog State Transition*.
* Using *Dialog Workflow.*

In this example, we would be using the *Dialog Workflow*. You can read more about the *Dialog State Transition* in our Configuration section. The *Dialog Workflow* provides a highly flexible editor to configure the workflow which makes it recommendable for users.

## Dialog Workflow

To create a workflow, using Dialog Workflow, go to the *IntentsAndAutomation->Skills/DSM* and select *Dialog Workflow* tab. Use the `+` button to create a new workflow.

![](https://2566128011-files.gitbook.io/~/files/v0/b/gitbook-x-prod.appspot.com/o/spaces%2FUn1oKrw7P8P5qiTjWXjv%2Fuploads%2F7ufdqS3KRL1BSX2lROeN%2Fdialog-workflow-ui.JPG?alt=media\&token=d1f4ccb4-9a44-4010-ba08-3485c6628e65)

Each workflow is characterized by

* Name : An unique string used to identify the workflow
* Description : Description of the workflow
* Action/Configuration : Definition of the workflow and actions

> > Note that you can define the *Action/Configuration* only after the *Name* and *Description* have been defined and saved. Both *Name* and *Description* are mandatory fields.

For the *applyLeave* intent we are working on this example, let us create a workflow *leaveApplicationSkill* as seen in the image above.

### Map to Intent

We will now proceed to map the workflow to the intent (in our working example, *applyLeave*). The intents can be mapped using the *Map Intent* button under the *Action/Configuration* column.

![Map intent](https://2566128011-files.gitbook.io/~/files/v0/b/gitbook-x-prod.appspot.com/o/spaces%2FUn1oKrw7P8P5qiTjWXjv%2Fuploads%2F8T9EjeVQHbUtJYqjGip2%2Fdialog-workflow-map-intent.JPG?alt=media\&token=01f2b44a-f280-4211-a893-32afe44fb89f)

This would display the *Map Handler And Intent* page that allows you to map the intent. All the intents you have defined would be displayed in the *Intent* combobox. Select the *applyLeave* intent and Save to continue.

### View / Edit Workflow

Having mapped the intent to the newly created workflow, it is now time to define the actual workflow. Use the *View/Edit Workflow* button under the *Action/Configuration* column to open the Workflow Editor.

> Note that the workflow editor will prohibit the user from defining the workflow if the Intent is not mapped. The Workflow Editor mandates the intent to be mapped prior to defining the workflow.

The Workflow Editor provides an easy WYSWYG editor for creating workflows with easy flow-charts.

![Workflow Editor](https://2566128011-files.gitbook.io/~/files/v0/b/gitbook-x-prod.appspot.com/o/spaces%2FUn1oKrw7P8P5qiTjWXjv%2Fuploads%2FbhjVazIh8qCqJZlEDWTo%2Fdialog-workflow-editor-ui.JPG?alt=media\&token=1b74130d-dab3-477e-8c91-f3c6077eb56d)

The Editor comprises two key components.

* Dialog Functions
* Editor View

The Dialog Functions provides the available functions which can be executed by the Workflow Automation. This also includes an explicit *Start* and *Exit* function, which identifies the start and end of the workflow.

The key functions available are

* START : Signals the start of the workflow.
* EXIT : Signals the end of the workflow.
* IF : Specifies an if condition
* CALLAPI : \_Makes calls to an Rest Endpoint
* GET : Recieves the input from User
* SPEAK : Provide a response to the User
* SET : Set a slot's value, Eg SET validate = true ;
* DO : Call a sub intent. The skill linked to that intent will be called.
* SPEAK\_4\_EACH : If an API sets a parameter with value as List of strings, SPEAK\_4\_EACH can make the bot speak all the values in the list. For Example, SPEAK\_4\_EACH listOfShortListedCandidates ;
* WAIT : WAITS for the given micro seconds before executing next command. For Example, WAIT 2000 ;
* EXPECT : Expects a slot or a comma separated set of slots to be given by the user (there won't be a prompt utterance to ask for the slot in this case)
* TAKE\_PAYMENT : Takes payment and updates status to a slot
* ESCALATE : Escalate the conversation to the supervisor
* EMAIL : Send an email
* SAVE2\_SHEET : Save values to the spreadsheet. Spreadsheet is available in Reports Section

In addition to the Dialog Functions, the Editor also supports *Connectors* which describe the transition or relation between the actions. These include

* STRAIGHT
* NONE
* ANY
* USER\_DONT\_KNOW
* PRESENT
* VALUE

We will now proceed to define our workflow steps.

{% content-ref url="/pages/4A2BKtBcBo0PkUsUA5Cy" %}
[Read Inputs](/getting-started/train-your-bot/configure-workflow/read-inputs)
{% endcontent-ref %}


# Read Inputs

Now that we have the required *slots* and *triggers* configured, it is time to configure the actual workflow.

An ideal workflow for the *applyLeave* intent would be

1. Ensure startDate and endDate are available.
2. Ensure *leaveReason* is available.
3. Mark the leave using the available end-point
4. Response to User the action has been completed.

Let us begin creating the workflow.

## Configure Workflow

Every workflow configured might contain a varying number of steps depending on the intent. Irrespective of the logic involved, each of the workflow will begin with a *Start* Action and is terminated by an *End* action.

### Start Action

The *Start* Action marks the first step of the workflow. Every workflow defined has a single *Start* action. You can add the *Start* Action by dragging and dropping the action from the Action Panel to the Editor.

![Start Action](https://2566128011-files.gitbook.io/~/files/v0/b/gitbook-x-prod.appspot.com/o/spaces%2FUn1oKrw7P8P5qiTjWXjv%2Fuploads%2FvG5Vj47qqIyVf1Y4uiXI%2Fdialog-workflow-Start-action.JPG?alt=media\&token=9f7aa2b9-eb12-4894-90dc-0bccbd17832d)

### Read Inputs

Once we have marked the first step of the workflow, as per the outline of workflow we created at the beginning of this document, the next step is to ensure the key parameters (slots) which are required by the intent are captured.

This can be ensured by adding an *Get* Action. The *Get* action accepts a single parameter, which points to the slot that needs to be read. You can add the *slotName* as shown in the figure below.

![Get Action](https://2566128011-files.gitbook.io/~/files/v0/b/gitbook-x-prod.appspot.com/o/spaces%2FUn1oKrw7P8P5qiTjWXjv%2Fuploads%2FizDP1WEsQjzlevKZAyvC%2Fdialog-workflow-get-action.JPG?alt=media\&token=b74e50b9-b591-48c1-973a-715fe57137b0)

Drag 3 *Get* actions to the workflow editor and specify each of the slots we require in each of them. We will begin by collecting the *startDate*, followed by the *endDate* and *leaveReason*. You can mark the order by using the transition/relation lines as shown in the figure.

![Read Inputs](https://2566128011-files.gitbook.io/~/files/v0/b/gitbook-x-prod.appspot.com/o/spaces%2FUn1oKrw7P8P5qiTjWXjv%2Fuploads%2FqfJ0fV3HGQRCgOCI0jNu%2Fdialog-workflow-editor-input-values.JPG?alt=media\&token=986b62d9-5104-4a51-a00e-f02e1471a594)

### Record Information

At this point, there are two options. The developer can design the workflow to make use of a Rest endpoint to save the values. On other hand, when the requirement to have a backend endpoint is not that high, you could also make use of our no-code approach and save the values in a spreadsheet. We will look into both approaches.

{% content-ref url="/pages/MFMnLbMvpP0v0w8iGHFa" %}
[No Code Approach](/getting-started/train-your-bot/configure-workflow/no-code-approach)
{% endcontent-ref %}

{% content-ref url="/pages/IRX31bGd3xZYGKlnsqsK" %}
[REST Endpoints Approach](/getting-started/train-your-bot/configure-workflow/rest-endpoints-approach)
{% endcontent-ref %}


# No Code Approach

If you do not have a backend Rest API to support your operations, you can use a no-code/low-code approach to log the information collected from the User in a spreadsheet.

![No Code approach](https://2566128011-files.gitbook.io/~/files/v0/b/gitbook-x-prod.appspot.com/o/spaces%2FUn1oKrw7P8P5qiTjWXjv%2Fuploads%2FQO9wIomYpMlzNJHyJKcg%2Fdeveloper-guide-no-code.png?alt=media\&token=323a558e-b037-4419-b7ef-675f7e5e7374)

All inputs collected using the spreadsheet can be accessed using the *Reports->Statitics->Output Spreadsheet*.

In order to store the collected slots into spreadsheet, add a SAVE\_2\_SHEET action to the workflow editor. The SAVE\_2\_SHEET action accepts a single parameter - whitespace-separated list of slots that needs to be saved in the spreadsheet

![Save slot informtion in spreadsheet](https://2566128011-files.gitbook.io/~/files/v0/b/gitbook-x-prod.appspot.com/o/spaces%2FUn1oKrw7P8P5qiTjWXjv%2Fuploads%2FM0212OayIj0ZGqzt5NdE%2Fdialog-workflow-editor-savetoexcel-values.JPG?alt=media\&token=5d188cd7-6e32-4eb1-8fc0-8cb69d8aa784)

As seen in the image above, pass in the 3 different slots which are being used in the *applyLeave* intent.

The spreadsheet created can be accessed using the *Reports->Statitics->Output SpreadSheet*.&#x20;

![Result in spreadsheet](https://2566128011-files.gitbook.io/~/files/v0/b/gitbook-x-prod.appspot.com/o/spaces%2FUn1oKrw7P8P5qiTjWXjv%2Fuploads%2FGCLKAMuXuuMDDQ3igmlm%2Fdialog-workflow-result-spreadsheet.JPG?alt=media\&token=d1d6d010-9081-42f9-8214-81b9d4f23da0)


# REST Endpoints Approach

Dhee.AI also allows enterprise applications to make use of their existing REST endpoints and allow the voice bots to communicate directly with them. This allows integration with existing back-end applications easier.

![Connect your REST endpoints](https://2566128011-files.gitbook.io/~/files/v0/b/gitbook-x-prod.appspot.com/o/spaces%2FUn1oKrw7P8P5qiTjWXjv%2Fuploads%2FINOcqeenzhzgd5HQXsGH%2Fdeveloper-guide-api-approach.png?alt=media\&token=b47a6682-39e4-4041-aa66-448f40b04487)

With the backend endpoints defined (in this example we will use the APIs we have defined in [Define your REST EndPoints](/getting-started/train-your-bot/write-your-rest-endpoints) section). With REST endpoint approach, our workflow would look slightly different.

In order to support calls to API end points, use the CALL\_API action.

![CALL\_API Action](https://2566128011-files.gitbook.io/~/files/v0/b/gitbook-x-prod.appspot.com/o/spaces%2FUn1oKrw7P8P5qiTjWXjv%2Fuploads%2FyQaj4ol2gwZ8Ck9JdiU6%2Fdialog-workflow-callapp-action.JPG?alt=media\&token=6a0be335-45c5-4175-ba43-4648fcb37079)

The CALL\_API actions a single parameter, which is the identifier for the API defined in [Configure Backend API](/getting-started/train-your-bot/configure-endpoints).

The complete Workflow would be as the following.

![Using CALL\_API](https://2566128011-files.gitbook.io/~/files/v0/b/gitbook-x-prod.appspot.com/o/spaces%2FUn1oKrw7P8P5qiTjWXjv%2Fuploads%2FRuTEx7CnqxOJlYWXIlLR%2Fdialog-workflow-editor-apiendpoint-complete.JPG?alt=media\&token=ca9ea6e2-e7e9-4f0f-8088-598f8f4f5904)


# Acknowledge User

### Notify User

Once we have recorded the information (leave details), we need to notify the user that he has successfully applied for leave. The *Speak* action could be used for this purpose. The *Speak* action accepts a single parameter, the name of the previously added *Agent Response*.

![Speak Action](https://2566128011-files.gitbook.io/~/files/v0/b/gitbook-x-prod.appspot.com/o/spaces%2FUn1oKrw7P8P5qiTjWXjv%2Fuploads%2FPEBVQaAc7G0TzEPONKDn%2Fdialog-workflow-speak-action.JPG?alt=media\&token=534c84c0-da64-46b0-98d1-9c3b08306032)

In this case, we will add the previously added Agent Response, which we had named *leaveRegisteredMLT*.

### Stop

The final action, as mentioned earlier is to indicate the workflow is completed. This is done using the *Exit* action.

![Exit Action](https://2566128011-files.gitbook.io/~/files/v0/b/gitbook-x-prod.appspot.com/o/spaces%2FUn1oKrw7P8P5qiTjWXjv%2Fuploads%2FMrdJTBldfnlMTc3OhnUj%2Fdialog-workflow-exit-action.JPG?alt=media\&token=bd704871-420a-4471-b02f-a6667728a996)

&#x20;The complete workflow at this point looks like the following.

![Complete workflow for no-code approach](https://2566128011-files.gitbook.io/~/files/v0/b/gitbook-x-prod.appspot.com/o/spaces%2FUn1oKrw7P8P5qiTjWXjv%2Fuploads%2FE62agwPEI0xdWMS3ajd3%2Fdialog-workflow-editor-savetoexcel-complete.JPG?alt=media\&token=1b340062-b34a-44d0-b14a-3e73556c4150)


# Build and Deploy

Digest the content into useful work

Once you have defined and configured the voice agent (as mentioned in previous sections), the next obvious step is to build, test and deploy it.

![](https://2566128011-files.gitbook.io/~/files/v0/b/gitbook-x-prod.appspot.com/o/spaces%2FUn1oKrw7P8P5qiTjWXjv%2Fuploads%2FXBVe0pFXiBI4m7fBILJA%2Fdeveloper.guide.build.png?alt=media\&token=5fcd6481-1aed-49a6-8d17-2e9a462523aa)

{% content-ref url="/pages/NgkojTvDRxvE83bqLLrE" %}
[Build](/getting-started/build-and-deploy/build)
{% endcontent-ref %}

{% content-ref url="/pages/XZQk80CMR8SkuFPLFHRJ" %}
[Test](/getting-started/build-and-deploy/test)
{% endcontent-ref %}


# Build

The developer can build the favorite bot from the *\_Test and Deploy->Build\_* Section.

![Build bot](https://2566128011-files.gitbook.io/~/files/v0/b/gitbook-x-prod.appspot.com/o/spaces%2FUn1oKrw7P8P5qiTjWXjv%2Fuploads%2FvjWnUPxGw9cTAKOwAfuv%2Fbuild.JPG?alt=media\&token=6019282d-6067-4d0d-be7f-78899a89d4f4)

The build process can be triggered using the \`Build\` button. This would trigger the build for the NLP Model and Voice Model. The progress can be monitored using the progress bar as well as the *\_Overall Status\_* indicator.


# Test

## Test Environment

As mentioned, Dhee.AI facilitates testing of your bot before deploying. This is highly useful to figure out our early bugs and ensure your production server is not affected. The developer can test the bot using the *Test and Deploy->Test*.

![Test UI](https://2566128011-files.gitbook.io/~/files/v0/b/gitbook-x-prod.appspot.com/o/spaces%2FUn1oKrw7P8P5qiTjWXjv%2Fuploads%2F9Z7nKMdoK3qglUErHLbw%2Ftest-main-ui.JPG?alt=media\&token=5b598c0d-0623-464c-a6ce-694f4b83efef)

The Test UI is divided into two key subsections.

### Testing your bot.

You can test the Agent using the *Test Agent* section of the Test Module.

![Testing your bot](https://2566128011-files.gitbook.io/~/files/v0/b/gitbook-x-prod.appspot.com/o/spaces%2FUn1oKrw7P8P5qiTjWXjv%2Fuploads%2FZnqYd39Xmo9q2rZON5lw%2Ftest-agent.JPG?alt=media\&token=52ed4127-c8f7-4591-b310-e0c29415ded3)

You can provide the language of your choice, along with Username and phone number. You could also opt to skip providing Username and phone number. This would invoke the agent. You can now test your bot by communicating with it.

![Testing your bot](https://2566128011-files.gitbook.io/~/files/v0/b/gitbook-x-prod.appspot.com/o/spaces%2FUn1oKrw7P8P5qiTjWXjv%2Fuploads%2F54mKYgotTlXZhEL2Uwme%2Ftest-agent_sayhello.JPG?alt=media\&token=71edcf75-cc78-4be8-b568-9b9898497dd4)

As seen in the image above, the *trigger* "I am sick" successfully helped in identifying the *applyLeave*. In response, the bot also requested the user for one of the slots *startDate*.

You can use the Test Agent to test your bot within the sandbox environment.

### Debug Insights

Dhee.AI also allows you to debug your bot and understand the behavior better. This is useful for developers in understanding the response of the bot to queries.

![Debug Insights](https://2566128011-files.gitbook.io/~/files/v0/b/gitbook-x-prod.appspot.com/o/spaces%2FUn1oKrw7P8P5qiTjWXjv%2Fuploads%2FHvBAVQE3vyvhpJRzHHRB%2Ftest-debug-insights-main.JPG?alt=media\&token=2198f5a7-625b-4c3e-b8e1-5761b1c2741d)

**Parse**

The Parse section allows the developer to debug the bot and understand the parsed information (described in JSON format). Developer can use these insights to define their bot better.

![Parse input ](https://2566128011-files.gitbook.io/~/files/v0/b/gitbook-x-prod.appspot.com/o/spaces%2FUn1oKrw7P8P5qiTjWXjv%2Fuploads%2FKmrtg2T9G9NfmVCYFYOw%2Ftest-debug-insights-parse.JPG?alt=media\&token=dfe2a616-c20c-45ef-80be-d75991630263)

**Extract Intent**

If the developer needs to verify that the bot is correctly recognizing the intent in the test environment, he can use the *Extract Intent* section.

![Extract Intent ](https://2566128011-files.gitbook.io/~/files/v0/b/gitbook-x-prod.appspot.com/o/spaces%2FUn1oKrw7P8P5qiTjWXjv%2Fuploads%2Fin2gvJB0eY7x63sb92MA%2Ftest-debug-insights-extract-intent.JPG?alt=media\&token=39c22f15-f122-4b14-ab6c-56b2f58c441f)

This would display the intent identified by the bot. For example, for the text *"I am sick"*, the following displays the intent recognized.

```
Output

{
  "success": true,
  "result": {
    "userIntent": {
      "createdBy": "35dad000-9246-11ea-9ba6-69dfff26a0d5",
      "createdDate": 1644827200351,
      "lastModifiedBy": "e2b0c7a0-7b27-11ec-b23b-837257ce5410",
      "lastModifiedDate": 1645330104597,
      "id": "d5705d80-8d6f-11ec-b6a7-a372c48d3432",
      "name": "applyLeave",
```

Once again, these insights would help in further improving the bot performance.

**Extract Slot**

Similarly, the slots recognization could be debugged using the *Extract Slot* section.

![Extract Slot](https://2566128011-files.gitbook.io/~/files/v0/b/gitbook-x-prod.appspot.com/o/spaces%2FUn1oKrw7P8P5qiTjWXjv%2Fuploads%2FGAMGJ2r4mQ9PI1VCLSjz%2Ftest-debug-insights-extract-slot.JPG?alt=media\&token=57b1901b-47ee-4283-92f5-211c4c435a13)

Consider the following Text.

```
I want to take leave from 24th
```

Debugging the text in *Extract Slot* would result in the following

```
{
  "startDate": {
    "value": "24-03-2022",
    "tokenOrder": 7,
    "sentenceId": "fb37db2a-73f5-4ca8-a8d7-ebde25c0d78e"
  }
}
```

As seen in the output, the slot value has been recognized correctly.


# Deploy

Let the bot see the world, do good, say good.


# Embedding Widget in Apps

Ready to use chat widgets for your Apps.

You can embed the out of the box widget that the platform can serve in a mobile or tablet apps too. This is done by calling the responsive widget URL served by the dhee.world domain in your web views.

E.g, embedding https\://{your-bot-instance}.dhee.world in a web-view in your app will show a widget like this-

![](https://2566128011-files.gitbook.io/~/files/v0/b/gitbook-x-prod.appspot.com/o/spaces%2FUn1oKrw7P8P5qiTjWXjv%2Fuploads%2FNDgRzASN7prHHqpUwRR9%2Fimage.png?alt=media\&token=4a40224a-cee4-496b-a0c2-38358a97e9a4)

#### Change background

The background colour around your widget can be changed by adding a GET parameter named ***bgColor***.&#x20;

The bgColor parameter has to be set to the hex code of the colour you want (without prefixing with the # symbol"

E.g, <https://mybot.dhee.world?bgColor=0d66d5>

#### Show full-screen chat widgets

To remove the halo and the background from the default widget and display a fullscreen widget, you just need to add a GET parameter named ***fullscreen.*** The value of the parameter should always be set to true.

E.g, <https://mybot.dhee.world?fullscreen=true>

### Launching Web-View with the logged in user details

Many times, you would want to launch a chatbot for engaging users who are already logged in to your App. In such cases you can let Dhee be aware that you are launching the bot for a given logged-in user. This is done by sending the user's details in a JSON string, after encrypting it using AES encryption. The encrypted payload should then be included in the dhee.world URL as a GET parameter "payload".

The flavour of AES we are using is AES-CBC, which requires the encrypting side to include an Initialisation Vector, which is a Byte array of size 16.

The JSON payload to be encrypted, should be of the format:

```json
{
    userName:"loggedInUsersFullName",
    language:"loggedInUsersLanguagePreference",
    contactNumber:"loggedInUsersContactNumber",
    userInfoParam1:"Some information of use in Dialog automation, like app userId",
    userInfoParam2:"Some other information of user in dialog automation",
    userInforParamN:"yet another information"
}
```

#### Payload JSON Parameters

| Parameter                    | Remarks                                                                                                                                                                                                                |
| ---------------------------- | ---------------------------------------------------------------------------------------------------------------------------------------------------------------------------------------------------------------------- |
| userName                     | The full name of the logged in user.                                                                                                                                                                                   |
| language                     | The preferred language of the logged in user. This has to be a language that [Dhee.AI supports](https://readme.dhee.ai/platform-overview/elements-and-configuration/agent-settings/basic/language#supported-languages) |
| contactNumber                | The mobile number of the logged in user. If not available please set is as "0000000000" (ten zeroes)                                                                                                                   |
| Additional custom parameters | Any additional parameters that you provide will be made available to your Dialog state machines as a slot with the same parameter name. Please make sure the parameter names are single words in camel case.           |

#### Request Headers

The GET request should have the following header:

```
key-vec:{Base64 encoded value of the byte array used as Init Vector}
```

As hinted above, the value of the header ***key-vec*** should be the base-64 encrypted form of your initialisation vector.

#### Encryption Key

The key used for AES encryption has to pre-configured in the Dhee developer platform in the **Agent Settings/Advanced Settings** Page, as the **WEB\_VIEW\_KEY** parameter

As you can see from the screenshot below, this parameter will be auto-generated for you if you edit and save this field in the Advanced Setting page.

![web-view payload encryption key](https://2566128011-files.gitbook.io/~/files/v0/b/gitbook-x-prod.appspot.com/o/spaces%2FUn1oKrw7P8P5qiTjWXjv%2Fuploads%2FyfuGcwyISJqLx15yZ95P%2Fimage.png?alt=media\&token=413b7283-b004-4c79-8efa-d1f1a009d214)

#### Example request

```
GET /?payload=JxOQINPDFhJs2Ozwd7X97m6SOCKSn7k2M8N90iD9gs1+Tnffp9JMgQC6NN4dKyXqJwMcnu32IpWvrkT3jLwI+g==&fullsreen=true HTTP/1.1
Host: mybot.dhee.world
key-vec: FQQWV9gToG3RMT+I0+bi0w==
```


# Platform Reference

Use Dhee.AI to make your tech-stack come alive and talk to your customers

![](https://2566128011-files.gitbook.io/~/files/v0/b/gitbook-x-prod.appspot.com/o/spaces%2FUn1oKrw7P8P5qiTjWXjv%2Fuploads%2FygFbxGgLlgHEAl2QTnbe%2FOverview.png?alt=media\&token=13cf04ef-e93c-49b1-90fe-f447a34e5e0b)

Dhee.AI is an industry grade conversational AI which has efficient semantic searches and process memory, making it a one-stop solution for a diverse range of conversational automation use cases.

Enterprises can use Dhee.AI to develop intelligent virtual agents (IVA) which can :

* Converse with their customers on social chat platforms like WhatsApp and Telegram
* Take telephony calls coming into the company's IVR,
* Perform voice assisted chat on a website via an out of the box chat widget
* Deliver conversational experience via a custom user interface using Dhee’s voice and text APIs.

### The Indian Language Focus :dart:

For businesses intending to create conversational user interfaces for their consumers in the Indian subcontinent, Dhee.AI is probably the best choice to create those automations on.

Currently one can train and use Dhee.AI's NLP, speech recognition and speech synthesis in these languages - Indian English, Hindi, Bangla, Tamil, Marathi, Kannada, Telugu, Gujarati, Malayalam

![dhee । தீ । ধী । ధీ । धी । ಧೀ । ധീ । ઘી । ଢ଼ୀ](https://2566128011-files.gitbook.io/~/files/v0/b/gitbook-x-prod.appspot.com/o/spaces%2FUn1oKrw7P8P5qiTjWXjv%2Fuploads%2FSNtrHJNJeGL7IlziPDws%2Fdhee.png?alt=media\&token=075bf1ae-026d-41f0-9461-6b49a92670e5)

### Training is flexible and granular too :woman\_in\_lotus\_position:

&#x20;From the default utterances to Named entities to Developer defined entities, Dhee has a wide range of customization and granular training options. Not to mention you can customize the out-of-the box chat widget that we provide for your websites too.

Dhee.AI also has a very flexible and unique Dialog-State-Machine module, which supports hierarchical calls and flexible slot comparisons, making it a step ahead of graph based methods adopted by the rest of the industry for dialog automation.

### Web Scale :globe\_with\_meridians:

&#x20;Dhee abstracts out the compute requirements and provides you with a simple elastic interface which scales to cater to the number of concurrent users engaging with your IVA. With the capacity of our AI cloud increasing every passing week, you can safely leave the scalability of your conversational automation to us.


# Manage Projects

The project is the bot, and the bot is the project.

### Manage Project

Developer can create and Project using the *Manage Project* in the Dhee.AI dashboard.

![Manage Projects](https://2566128011-files.gitbook.io/~/files/v0/b/gitbook-x-prod.appspot.com/o/spaces%2FUn1oKrw7P8P5qiTjWXjv%2Fuploads%2FYxXCSNOn9hdB9ejAQ9G8%2Fmanage-projects.PNG?alt=media\&token=60e79e29-d7b2-47e0-90ba-dd09eb0a9fce)

### Create Project

Once inside the *Manage Project,* screen User can use the *Create Project* Button to create a new Project. This would create a new wizard for creating a project.

![Projects](https://2566128011-files.gitbook.io/~/files/v0/b/gitbook-x-prod.appspot.com/o/spaces%2FUn1oKrw7P8P5qiTjWXjv%2Fuploads%2FgsrNSCf2Bng2W1JpMvQe%2Fcreate-new-project.PNG?alt=media\&token=33f77e21-e513-4ed9-9107-a3357f36aed2)

In the first step, you need to provide the following details

* Project Name
* Description
* Domain

![Create Project](https://2566128011-files.gitbook.io/~/files/v0/b/gitbook-x-prod.appspot.com/o/spaces%2FUn1oKrw7P8P5qiTjWXjv%2Fuploads%2FWQ0xLNAB22iIIYn21xY0%2Fcreate-project-wizard-step1.PNG?alt=media\&token=84efa24a-bba1-41d5-92f3-f64e32145633)

Dhee.ai's sophisticated agents are pre-trained on the most common domains in the industry. This equips them to accurately interpret domain-specific contends and handle monotonous queries, thereby allowing businesses to make more use of their time productively.

Following Domains are supported in Dhee.AI by default

* Insurance
* Hospitality & Co-working
* Education & Edutech
* Banking and Finance
* Governance and Social Science
* Food and Beverages
* Healthcare
* Retail
* Travel and Tourism
* Manufacturing
* Shipping and Logistics
* Information Technology
* Gaming, Media and Entertainment
* Real Estate
* Fitness and Wellness

On creating the Project, the Developer would be shown the different payment plans he could choose. This could be selected/changed at a later stage too.

![Payment Options](https://2566128011-files.gitbook.io/~/files/v0/b/gitbook-x-prod.appspot.com/o/spaces%2FUn1oKrw7P8P5qiTjWXjv%2Fuploads%2FGf3wmckqDDtyfuFI4OjY%2Fpayment.PNG?alt=media\&token=507847ec-0f66-4523-af3e-17362d186c5b)

Once the payment plan is selected/skipped, the User would automatically be redirected to the Project's Dashboard.

### Edit Project Details

The developer can change the Project Details at a later stage using the *Manage Project* screen. The *Edit Button* allows the developer to *Project Name* and *Project Description*. The Domain of the Project cannot be changed once it is created.

![Edit an existing  Project](https://2566128011-files.gitbook.io/~/files/v0/b/gitbook-x-prod.appspot.com/o/spaces%2FUn1oKrw7P8P5qiTjWXjv%2Fuploads%2FgsrNSCf2Bng2W1JpMvQe%2Fcreate-new-project.PNG?alt=media\&token=33f77e21-e513-4ed9-9107-a3357f36aed2)

### Delete Project Details

The *Manage Project* screen can be used to Delete any previously created project using the Delete Button. This would invoke a confirmation dialog, ensuring/reconfirming with the developer about the intended action.

![Delete Existing Project](https://2566128011-files.gitbook.io/~/files/v0/b/gitbook-x-prod.appspot.com/o/spaces%2FUn1oKrw7P8P5qiTjWXjv%2Fuploads%2FgsrNSCf2Bng2W1JpMvQe%2Fcreate-new-project.PNG?alt=media\&token=33f77e21-e513-4ed9-9107-a3357f36aed2)

### Upgrade Plan

As mentioned earlier, the Developer can Update/Select his payment plans after the Project has been created. The *Upgrade Plan* shows the user the different plans provided Dhee.AI.

Users can use the *Cancel Button* to go back to the Dashboard.


# Agent Settings

In the beginning, there were the settings.

![](https://2566128011-files.gitbook.io/~/files/v0/b/gitbook-x-prod.appspot.com/o/spaces%2FUn1oKrw7P8P5qiTjWXjv%2Fuploads%2FqLHa4usxthddTc6eINXc%2Fchatbot.png?alt=media\&token=46e8f6fe-927d-4aeb-ae21-ac6d89016ca7)

Before we start training our bot for serving the customers, we need to decide on a few things, and let Dhee know of the same. For example,

* Which industry domain is my bot broadly catering ? Like Banking, Retail etc.
* Which languages should by bot be interacting with the users ? Like English, Hindi, Bangla etc.
* Does it need Voice capability ?
* How should the look and feel of my chat widget be ?
* etc

Depending on the aspect of the bot being set, we can classify these settings to basic, widget-related and advanced. You can know about each of them by clicking the respective links below.

&#x20;

{% content-ref url="/pages/yFvNEohbeWSZaHLEMQZ7" %}
[Basic](/platform-reference/agent-settings/basic)
{% endcontent-ref %}

{% content-ref url="/pages/BOpC39R7OMxRxta9zUcY" %}
[Widget](/platform-reference/agent-settings/widget)
{% endcontent-ref %}

{% content-ref url="/pages/sXlO4s7L4yWToNcnqHPb" %}
[Advanced](/platform-reference/agent-settings/advanced)
{% endcontent-ref %}


# Basic


# Language

## Language

> If you talk to a man in a language he understands, that goes to his head. If you talk to him in his own language, that goes to his heart - *Nelson Mandela*&#x20;

dhee.aI is a multilingual AI/NLP platform, which allows businesses to serve native language speakers in the language of their choice by engaging our **Artificial Vernacular Agents**. This allows business entities to serve a wider audience, providing support for customers in a language they are comfortable with.

![](https://2566128011-files.gitbook.io/~/files/v0/b/gitbook-x-prod.appspot.com/o/spaces%2FUn1oKrw7P8P5qiTjWXjv%2Fuploads%2Ft8UHGrbAagvZQLrInWpD%2Flanguage-sketch.png?alt=media\&token=7a251098-fb22-42a1-8944-e292465c3d7a)

Our conversational agents allow you to leverage AI at scale and interact in a multitude of languages (*oral and text*). Our engine is capable of logical parsing of user utterances to create new information using deduction. This increases the accuracy of our entailment algorithms and helps in serving native language speakers by engaging in vernaculars.

You can configure your agent to support multiple languages offered by Dhee.AI via the *AgentSettings->Basic->Language* Settings from your dashboard.

![Configure supported languages](https://2566128011-files.gitbook.io/~/files/v0/b/gitbook-x-prod.appspot.com/o/spaces%2FUn1oKrw7P8P5qiTjWXjv%2Fuploads%2FtiXyD4ximaCtjayAR71U%2Flanguage101.png?alt=media\&token=1dfeed03-f92b-4ef5-b85b-67ab9e51e31c)

### Supported Languages

By default, *English* is the default language. In addition, the agent could be configured to support&#x20;

* Hindi
* Malayalam
* Bangla
* Kannada
* Telugu
* Tamil
* Gujarathi
* Marathi

{% hint style="info" %}
Dhee.AI would be soon supporting *Arabic, Spanish, and German*. In course of time, support for more languages would be added
{% endhint %}

.


# Domain

Dhee.AI's sophisticated agents are pre-trained on the most common domains in the industry. This equips them to accurately interpret domain-specific contends and handle monotonous queries, thereby allowing businesses to make more use of their time productively.

![Interpret domain specific contends](https://2566128011-files.gitbook.io/~/files/v0/b/gitbook-x-prod.appspot.com/o/spaces%2FUn1oKrw7P8P5qiTjWXjv%2Fuploads%2F9Y1zSRycJw9lZQwU3YRm%2Fdomain101.png?alt=media\&token=8fbea614-5b9d-4953-b04a-01e6d5d1eb4c)

## Domain

Dhee.AI provides consumers the option to select their specific top-level domain while creating the Project.&#x20;

![Doman and Category configuration](https://2566128011-files.gitbook.io/~/files/v0/b/gitbook-x-prod.appspot.com/o/spaces%2FUn1oKrw7P8P5qiTjWXjv%2Fuploads%2Fa591Uxt2Z617OeHqDDk5%2Fdomain102.PNG?alt=media\&token=ecbbfe4f-ffd9-4857-90ca-95c948193bb8)

The *Top Level Domain* would be preselected in the *AgentSettings->Basic->Domain*. Users can add additional custom domains using the *Add* button.

![Add Domain](https://2566128011-files.gitbook.io/~/files/v0/b/gitbook-x-prod.appspot.com/o/spaces%2FUn1oKrw7P8P5qiTjWXjv%2Fuploads%2Fsa2MVNe8fFxbWgi4ViEa%2Fdomain104.PNG?alt=media\&token=2f410eea-d72e-410c-915b-bac12a04aa14)

### Sub Category

In addition, it also provides an option to create various sub-categories. These are helpful in generating analytic reports based on specific subcategories. The *Add Sub Categories* button on each of the created Domains allows Users to add subcategories.

![Add Sub Category](https://2566128011-files.gitbook.io/~/files/v0/b/gitbook-x-prod.appspot.com/o/spaces%2FUn1oKrw7P8P5qiTjWXjv%2Fuploads%2F8np9rXzv1CgdnduKF220%2Fdomain105.PNG?alt=media\&token=a2adc88a-7ab3-42d6-a98d-1af4f55adef5)

Each Domain and Categories include a *Name* and *Description* for uniquely identifying them. Users can *Edit* or *Delete* existing domains and/or subcategories using the *Edit* and *Delete* button associated with each of them.

![Edit/Remove domain and categories](https://2566128011-files.gitbook.io/~/files/v0/b/gitbook-x-prod.appspot.com/o/spaces%2FUn1oKrw7P8P5qiTjWXjv%2Fuploads%2FyNSl2r41iBE2ADzA4u4G%2Fdomain103.PNG?alt=media\&token=94b9c7c9-cb0a-4b21-ab5c-a12824116010)


# Voice

Dhee.AI agents support assistance over text and voice. Support for text chat is enabled by default. Business entities can enable support for voice agents using the *AgentSettings->Basic->Voice* menu.

![Enable Voice Agents](https://2566128011-files.gitbook.io/~/files/v0/b/gitbook-x-prod.appspot.com/o/spaces%2FUn1oKrw7P8P5qiTjWXjv%2Fuploads%2F8eJ2h5B9EsOrLAA85vnk%2Fvoice101.PNG?alt=media\&token=9d092a41-15f6-4f3f-a93f-6648f4325898)

{% hint style="info" %}
The voice-enabled agents would incur an additional cost from the time of deployment as per usage. The setting could be changed later.
{% endhint %}


# Avatar Settings

Dhee.AI, partnering with "*to be filed*", optionally supports the usage of talking Avataar in chat widgets. Business entities can create avatars on our partner website and use the information in the portal.

The *AgentSettings->Basic->Avatar Settings* allows the businesses to configure whether to enable Avatar.

![Avatar Configuration](https://2566128011-files.gitbook.io/~/files/v0/b/gitbook-x-prod.appspot.com/o/spaces%2FUn1oKrw7P8P5qiTjWXjv%2Fuploads%2FTPZPAATLWpAfFuVFB7fW%2Favataar101.PNG?alt=media\&token=a3884222-5641-4c73-9f90-a2fb3c1ef587)

The avatar is characterized by

* Avatar ID
* Avataar Scene Id
* Scene Version Id

Additionally, the Avataar could be configured to support *Text To Speech* with LipSync.&#x20;

{% hint style="info" %}
Consumers could contact our *help desk* at [*help@dhee.ai*](email:help@dhee.ai) for assistance in configuring avatars.
{% endhint %}


# Widget


# Widget Theme

## Customize your Widget

Customers are empowered to customize their widget using a WYSIWYG (*What You See Is What You Get*) editor which aids them in personalizing their widget's appearance completely.

Changes are reflected immediately in the preview window enabling Customers to have an instant understanding of their changes and guiding them in the personalization process. Customers are allowed to configure

![Preview of Widget](https://2566128011-files.gitbook.io/~/files/v0/b/gitbook-x-prod.appspot.com/o/spaces%2FUn1oKrw7P8P5qiTjWXjv%2Fuploads%2FCediQmOpza1f7Npb8pWK%2Fwidget-theme101.PNG?alt=media\&token=1ed15484-fe90-46e6-bef1-314710d2e56c)

### Color Palette

The *Color Palette* settings allow you to change the color theme of the widget. You could choose from a predefined color palette of 266 colors or custom define your color with color codes. You could either use conventional hex codes (*#A2DE0FF*) or specify colors using the format `rgb(rColor,gColor,bColor)`(*rgb(66, 165, 245)*)

![Color Palette Selector](https://2566128011-files.gitbook.io/~/files/v0/b/gitbook-x-prod.appspot.com/o/spaces%2FUn1oKrw7P8P5qiTjWXjv%2Fuploads%2FUgdcCMTfwlMM0kDHdpL0%2Fwidget-theme102.PNG?alt=media\&token=490cc38d-f3c1-4f64-bba2-514198b7c469)

### Change Font

You could customize the Fonts used in the Widget using the *Change Font* settings. Currently, Dhee.AI's widget supports 5 fonts including&#x20;

* Roboto
* Source San Pro
* Lato
* Montserrat
* PT Serif

![](https://2566128011-files.gitbook.io/~/files/v0/b/gitbook-x-prod.appspot.com/o/spaces%2FUn1oKrw7P8P5qiTjWXjv%2Fuploads%2F9tUshdlgdT7rC2mOWhK6%2Fwidget-theme104.PNG?alt=media\&token=98ba058d-4b99-4fc2-8ba7-843732cbfd0d)

### Widget Logo

You could change the default Widget logo with your own custom images.

![Widget Logo Configuration](https://2566128011-files.gitbook.io/~/files/v0/b/gitbook-x-prod.appspot.com/o/spaces%2FUn1oKrw7P8P5qiTjWXjv%2Fuploads%2Fa4Fu1WWIvhNLNW3dr3tN%2Fwidget-theme103.PNG?alt=media\&token=cf3074b4-aaa6-4dac-999f-1caabb59e86a)

The image needs to be less than 512KB in size and should be in either of the following formats

* JPG/JPEG (*Joint Photographic Expert Group*)
* PNG (*Portable Network Graphics*)
* SVG (*Scalable Vector Graphics*)
* GIF (*Graphics Interchange Format*)

### Launcher Logo

You could change the default Launcher Icon with your own custom images.&#x20;

![Launcher Icon Configuration](https://2566128011-files.gitbook.io/~/files/v0/b/gitbook-x-prod.appspot.com/o/spaces%2FUn1oKrw7P8P5qiTjWXjv%2Fuploads%2FuWFrAgLLS6jcp9J766vZ%2Fwidget-theme105.PNG?alt=media\&token=4d5cbbb2-8b31-4b37-9293-d9f162b18525)

The image needs to be less than 512KB in size and should be in either of the following formats

* JPG/JPEG (*Joint Photographic Expert Group*)
* PNG (*Portable Network Graphics*)
* SVG (*Scalable Vector Graphics*)
* GIF (*Graphics Interchange Format*)

### Title Logo

You could change the default Launcher logo with your own custom images.

![Title Logo Configuration](https://2566128011-files.gitbook.io/~/files/v0/b/gitbook-x-prod.appspot.com/o/spaces%2FUn1oKrw7P8P5qiTjWXjv%2Fuploads%2FmvTBT34THB1BAc0DThRg%2Fwidget-theme106.PNG?alt=media\&token=ad6a7e0a-9139-4de9-a1e1-50b5034cba0e)

The image needs to be less than 512KB in size and should be in either of the following formats

* JPG/JPEG (*Joint Photographic Expert Group*)
* PNG (*Portable Network Graphics*)
* SVG (*Scalable Vector Graphics*)
* GIF (*Graphics Interchange Format*)


# Widget Label

Widget Label configuration allows the developer the configure the key labelings in the widget.

![](https://2566128011-files.gitbook.io/~/files/v0/b/gitbook-x-prod.appspot.com/o/spaces%2FUn1oKrw7P8P5qiTjWXjv%2Fuploads%2FdoQyUE7WtEBvmBUwjQVo%2Fwidget-label-configuration.JPG?alt=media\&token=19b4b44a-22c8-44a0-a4a7-300d9239822b)

The labels which can be configured by the developer includes

* Title : *Title/Name of the agent*
* Sub-Title : *Salutation to used for agent*.
* Introduction: *An introductory statement given by the agent*.
* Place Holder : *Place holder text*
* Agent Greetings : *Initial Greetings of the agent*.

![](https://2566128011-files.gitbook.io/~/files/v0/b/gitbook-x-prod.appspot.com/o/spaces%2FUn1oKrw7P8P5qiTjWXjv%2Fuploads%2F13CIORES2EZ7GaDJSHdK%2Fwidget-running.JPG?alt=media\&token=b70c5fdc-bdf7-4c55-94a6-3c882805e76f)


# Advanced

## Advance

The *AgentSettings->Advance* section provides access to configuring advanced custom settings.

![](https://2566128011-files.gitbook.io/~/files/v0/b/gitbook-x-prod.appspot.com/o/spaces%2FUn1oKrw7P8P5qiTjWXjv%2Fuploads%2FBxlXHUi2E3qherNEV4lG%2Fadvance.png?alt=media\&token=7224c107-d680-4b18-bfe0-8d5314a5178c)

The following custom configurations are available.

### AUTO\_LAUNCH

The configuration dictates whether the widget should auto-launched.

**Configuration Values**

| value | description         |
| ----- | ------------------- |
| yes   | enable auto-launch  |
| no    | disable auto-launch |

The default value is `false`.

### AUTO\_LAUNCH\_COUNTDOWN\_SECOND

In addition to the *Auto Launch* configuration, the User can configure the time delay after which the bot would be launched. The time delay is configured in seconds and the default value is `0` or `null`.

### AUTO\_SEND\_SPEECH

If the voice-assistance is enabled using *AgentSettings->Basic->Voice* configuration, the *Auto Send Speech* configuration enables the user to send the spoken utterances on pause.

**Configuration Values**

| value | description              |
| ----- | ------------------------ |
| yes   | enable auto-send speech  |
| no    | disable auto-send speech |

The default value is `no`.

### OTP\_AUTHORIZATION

Dhee.AI supports the authorization of Users via validation of OTP. The OTP\_AUTHORIZATION configuration is used to configure whether the widget should be allowed to use OTP authorization.

| value | description               |
| ----- | ------------------------- |
| yes   | enable OTP Authorization  |
| no    | disable OTP Authorization |

The default value is `no`.

### SKIP\_USER\_RECOGNITION

By default, the widget requires the User to provide a Name and Phone Number for User identification. The SKIP\_USER\_RECOGNITION option allows configuring the widget to skip collecting User information.

| value | description                       |
| ----- | --------------------------------- |
| yes   | hide user contact details form    |
| no    | display user contact details form |

The default value is `no`.

### DISABLE\_AUTO\_ESCALATION

The bot is allowed to escalate the User conversation to a human supervisor if it is unable to understand or process the queries. It would notify the Customer before escalating the issue to the human agent. DISABLE\_AUTO\_ESCALATION allows to override this behavior and stop the bot from escalating the issue. This is useful when there is a lack of human manpower to intervene and provide additional support.

**Configuration Values**

| value | description             |
| ----- | ----------------------- |
| yes   | disable Auto escalation |
| no    | enable Auto escalation  |

The default value is `no`.

### HIDE\_LANGUAGE\_SELECTION

Dhee.AI provides a multilingual conversation AI bot and facilitates the feature, allowing the user to choose the language of his choice from the Widget UI. However, customers who do need multi-lingual support could hide the Language selection dialog by using the HIDE\_LANGUAGE\_SELECTION.

**Configuration Values**

| value | description             |
| ----- | ----------------------- |
| yes   | hide language selection |
| no    | show language selection |

When enabled, the bot would support only a single language. The default value is `no`.

### FORCE\_ESCALTION\_ON\_2ND\_MISS

The widget can be configured to escalate the User conversation to a human agent if it misses the user utterances or queries the second time.

**Configuration Values**

| value | description                                      |
| ----- | ------------------------------------------------ |
| yes   | force escalation to a human agent on second miss |
| no    | do not force escalation to human agent           |

The default value is `no`.

### START\_MUTED

The widget is configured to start with audio support by default. This can be an inconvenience in certain circumstances. The START\_MUTED option allows the Customer to initiate the widget to start on silent mode.

**Configuration Values**

| value | description            |
| ----- | ---------------------- |
| yes   | enable silent startup  |
| no    | disable silent startup |

The default value is `no`.

### HIDE\_SKIP\_LINK

The user details form, which is displayed before loading the widget, has an option to *Skip* entering the details. The HIDE\_SKIP\_LINK allows the Customer to disable the link and ensure the user enters the user details.

**Configuration Values**

| value | description                             |
| ----- | --------------------------------------- |
| yes   | hide `Skip` link in User details dialog |
| no    | show `Skip` link in User details dialog |

The default value is `no`.

### INITIAL\_INTENT

The widget could be configured to start with a default intent for all users. For example, the widget could be configured to ask for User details in Tamil. The INITIAL\_INTENT provides an option to the Customer to configure the default intent. The default value is `null`.

### SOCIAL\_INITIAL\_INTENT

Similar to the INITIAL\_INTENT, the widget serving social media users could be configured using the SOCIAL\_INITIAL\_INTENT. A use-case of this configuration is the inability of social media users to select the language from widget UI. To handle such a scenario, the default language could be used as initial intent.

This configuration is only for Social media users and does not affect any other user group. The default value is `null`.

### GOOGLE\_ANALYTICS\_SUPPORT

Enables Google analytics support for your widget. Some of the common activities that could be tracked include

* Speaker on/off
* Conversation started
* Conversation ended
* User Message
* Mic on/mic off
* Bot message
* Human supervision
* Language change
* Payment started
* Payment ended

**Configuration Values**

| value | description                          |
| ----- | ------------------------------------ |
| yes   | enable support for Google analytics  |
| no    | disable support for Google analytics |

The default value is `no`.

### GA\_TRACKING\_ID

The GA\_TRACKING\_ID allows configuring the Google Analytics Tracking Id. Google Analytics Tracking Id allows retrieving the configuration of your google analytics. Google Analytics would be enabled only if supplied with a tracking id. The default value is `null`.

### INITIAL\_PARAMS

The INITIAL\_PARAMS allows passing parameters to the INITIAL\_INTENT. For example, the Widget could be configured with an announcement of current offers and asking if the user wishes to view them. The possible initial parameters for a "current\_offer" intent could be

```
"offer_running" : "true",
"offer_name" : "monsoon offer"
```

INITIAL\_PARAMS is applicable only if INITIAL\_INTENT is set. The default value is `null`.

### SILENCE\_AFTER\_INIT\_INTENT

The bot is configured to initiate a conversation with the User again after the initial intent is completed ( for example, the bot could ask *How can I help you ?*). This could be overridden by using the `SILENCE_AFTER_INIT_INTENT`. When configured, the bot would remain silent after the completion of the initial intent.

**Configuration Values**

| value | description                                                |
| ----- | ---------------------------------------------------------- |
| yes   | bot remains silent after completing initial intent         |
| no    | bot initiates conversation after completing initial intent |

This configuration is applicable only if the INITIAL\_INTENT is configured. The default value is `no`.

### NO\_REFERRER\_CHECKS

The Widget could track the referrer by default. When configured, NO\_REFERRER\_CHECKS ensures the referrer is not checked by the widget.

**Configuration Values**

| value | description                  |
| ----- | ---------------------------- |
| yes   | referrer checks are disabled |
| no    | referrer checks are enabled  |

The default value is `no`.

### SHOW\_INTERNAL\_CLOSE\_BUTTON

The customer could configure to display the widget within its iFrame. This would require a close button within the frame. SHOW*INTERNAL\_CLOSE\_BUTTON options allow the Customer to show the close button within the iFrame. These are especially useful for \_always open* widgets.

**Configuration Values**

| value | description                   |
| ----- | ----------------------------- |
| yes   | show internal close button    |
| no    | disable internal close button |

The default value is `no`.

### HIDE\_PHONE\_NUMBER\_AT\_ENTRY

HIDE\_PHONE\_NUMBER\_AT\_ENTRY allows disabling prompting for User phone numbers when the widgets startup. The default value is `no`.

**Configuration Values**

| value | description                         |
| ----- | ----------------------------------- |
| yes   | do not prompt for user phone number |
| no    | prompt for user phone number        |

The default value is `no`.

### USE\_WEBSOCKET - legacy

This configuration is now legacy and uses Web sockets by default.

### UNATTENDED\_ESCALATION\_EMAIL\_IDS

In case of escalated queries, if the bot is unable to successfully escalate the conversation due to the unavailability of the human agent (*supervisor is currently busy or unavailable*), the bot could be configured to email a list of emails about the same.

The UNATTENDED\_ESCALATION\_EMAIL\_IDS supports multiple email ids. The configuration supports a comma-separated list of email ids. The email would be sent to the list of email ids after the conversation ends.

The default value is `null`.

### MINIMISE\_FREE\_HAND\_TYPING

The customer can have requirements when the User needs to encourage to choose from a specific set of choices. These choices could be displayed as a collection of buttons. In such a scenario, the textbox would be disabled to discourage free-typing.

**Configuration Values**

| value | description                                                  |
| ----- | ------------------------------------------------------------ |
| yes   | enable input via preset options only - disallows free-typing |
| no    | free-typing is allowed                                       |

The default value is `no`.

### USE\_DHEE\_TTS

Enables the use of the Dhee Text to Speech module.

**Configuration Values**

| value | description               |
| ----- | ------------------------- |
| yes   | enable Dhee's TTS module  |
| no    | disable Dhee's TTS module |

The default value is `no`.

### TALISMA\_API\_URL

Dhee.AI supports the integration of [Talisma CRM](https://www.talisma.com/) with the widgets for escalations of queries. The TALISMA\_API\_URL allows configuring the Customer-specific Talisma API Url.

When configured the escalated message could be viewed and addressed from the Talisma CRM. The default value is `null`.

### WALLET\_REFILL\_AMOUNT

The WALLET\_REFILL\_AMOUNT option allows the user to configure the default refill amount. This facilitates easy refilling for the Customer as the amount would be displayed automatically during refill. This is usually higher than the plan amount if you want to make bulk refills of your wallet.

### READ\_ALOUD\_BUTTONS

The bot would read the displayed button and interactive lists aloud. Additionally, the button would be re-read aloud again if the User hovers the mouse over the buttons.

**Configuration Values**

| value | description               |
| ----- | ------------------------- |
| yes   | read aloud buttons        |
| no    | do not read aloud buttons |

The default value is `no`.

### MASK\_REPORT\_CONTACT\_NUMBER

The contact phone numbers of Users can be optionally masked in the generated Reports to ensure the security of the numbers.

**Configuration Values**

| value | description                        |
| ----- | ---------------------------------- |
| yes   | mask contact numbers in reports    |
| no    | display contact numbers in reports |

The default value is `no`.

### ALLOW\_SUPERVISOR\_CHAT\_LOGGING

The configuration allows to log in the in/out time of the supervisor in the Supervisor Escalation Portal.

**Configuration Values**

| value | description                                  |
| ----- | -------------------------------------------- |
| yes   | allow supervisor portal escalation logging   |
| no    | disable supervisor portal escalation logging |

The default value is `no`.


# Team

![](https://2566128011-files.gitbook.io/~/files/v0/b/gitbook-x-prod.appspot.com/o/spaces%2FUn1oKrw7P8P5qiTjWXjv%2Fuploads%2FgV84AD25SBEnUn51tnBG%2Fteam.png?alt=media\&token=93771f2b-3d1a-4812-89e0-cca4bf76e7e1)

Here are the articles in this section

{% content-ref url="/pages/3l77Td7KOlSOsB3hhZqK" %}
[Development Team](/platform-reference/agent-settings/team/development-team)
{% endcontent-ref %}

{% content-ref url="/pages/MijLebFAUfRP3Kmt9Doi" %}
[Support Team](/platform-reference/agent-settings/team/support-team)
{% endcontent-ref %}


# Development Team

The *AgentSettings->Team* settings allow the user to configure the team settings. The *Developer Team* tab allows the configuration of the development team.

![Development Team](https://2566128011-files.gitbook.io/~/files/v0/b/gitbook-x-prod.appspot.com/o/spaces%2FUn1oKrw7P8P5qiTjWXjv%2Fuploads%2F8znO6oNvxU703DLL8ntG%2Fdevelopment-team.JPG?alt=media\&token=190d962d-5ecf-4300-8254-31033135cb46)

Each team member is identified by an email ID and his/her role in the project. Allowed values for the Role are

* Administrator of a Project
* Developer of a Project
* Quality Analyst of a Project
* Service Engineer of a Project
* Guest In Platform
* Chat Handle of a Project
* Sales Manager of the Platform

Additionally, the team member should be approved to ensure access in the project.


# Support Team

The *AgentSettings->Team* settings allow the user to configure the team settings. The *Support Team* tab allows configuration of the Support team.

Each team member is identified by an email ID and the Domain he/she is working on. The domain and sub-domains are created using the *AgentSettings->Basic->Domain* section. Similar to the Development team members, the team member should be approved to ensure access to the project.<br>

We can also mention the work hours of the support team under ***Work Hours*** sub-section.

<figure><img src="https://2566128011-files.gitbook.io/~/files/v0/b/gitbook-x-prod.appspot.com/o/spaces%2FUn1oKrw7P8P5qiTjWXjv%2Fuploads%2FSwcOjNsYsaQ1ZozxZNiJ%2Fagent-settings-work-hours.png?alt=media&amp;token=5d567933-b1c5-4ec2-856c-c57e7acb5b83" alt=""><figcaption></figcaption></figure>

Start and the end time of the support team availability should be defined. Then for the chats escalated outside the defined hours, a customisable message will be displayed.&#x20;

We can customise the message by defining it in the *Multilingual Responses* section with the code *SUPPORT\_OFF\_HOURS\_MLT*.


# Import Export

The Import-Export features allow developers to import and export project configuration and contents.

![](https://2566128011-files.gitbook.io/~/files/v0/b/gitbook-x-prod.appspot.com/o/spaces%2FUn1oKrw7P8P5qiTjWXjv%2Fuploads%2FjMj7FSsG4XJgWgBNoAu6%2Fimport-export.png?alt=media\&token=5cbba7ed-c334-41d1-b13e-74b9cb604494)

### Import/Export Project

The entire project configuration could be imported/exported using the Import/Export Whole Project configuration.

![](https://2566128011-files.gitbook.io/~/files/v0/b/gitbook-x-prod.appspot.com/o/spaces%2FUn1oKrw7P8P5qiTjWXjv%2Fuploads%2Fi5kj3R1WCkp4zwM01Lqm%2FImport%20Export%20Whole%20Project.JPG?alt=media\&token=66c5638b-22ea-41e5-9ecb-ff3924e2a281)

### Import/Export Content

The Import/Export content allows the user to import and export specific contents or sub-parts of your project.

![](https://2566128011-files.gitbook.io/~/files/v0/b/gitbook-x-prod.appspot.com/o/spaces%2FUn1oKrw7P8P5qiTjWXjv%2Fuploads%2FkBVYgaseQqWv8Gm9Ardq%2FImport%20Export%20Contents.JPG?alt=media\&token=aff88c62-993f-4896-b267-0377531b7b6e)

Users can independently import and export

* FAQ
* Intents and Automations
* Backend APIs
* Multilingual Entities
* Language-Specific Entities
* Substitutions
* Custom Entity
* Incoming Dialog Directive
* Outgoing Dialog Directive
* Abbreviation Text


# Emailer

The Emailer configuration can be configured via *AgentSettings->Emailer*.

![Emailer configuration](https://2566128011-files.gitbook.io/~/files/v0/b/gitbook-x-prod.appspot.com/o/spaces%2FUn1oKrw7P8P5qiTjWXjv%2Fuploads%2F6AJUgmoWWYBc56s5bnSF%2Femail%20configuration.JPG?alt=media\&token=5656e9f1-42f5-43e9-9151-94d0a0a2a013)

The configuration requires the following details.

* Full Name : *Display Name of email*
* Email Address : *Email address to be used*
* Password : *Authentication Password*
* Outgoing Server : *Outgoing Mail Server*
* Requires SSL : *Boolean value indicating if SSL required*
* Requires Authentication : *Boolean value indicating if Authentication required*
* Outgoing Port for SSL : *Outgoing Port for SSL*
* Outgoing Port for TLS : *Outgoing Port for TLS*
* Requires TLS : *Boolean value indicating if TLS is required*
* Incoming Server : *Incoming mail Server details*
* Incoming Port : *Incoming Port*
* Signature : *Signature*


# Billing

![](https://2566128011-files.gitbook.io/~/files/v0/b/gitbook-x-prod.appspot.com/o/spaces%2FUn1oKrw7P8P5qiTjWXjv%2Fuploads%2FoWDEk8V9OnqX8JVKk96N%2Fagentsettings.billing.png?alt=media\&token=1e17ec95-8cd8-4ba7-ab57-292c3a075840)

The Project Billing is generated based on the information provided in the *AgentSettings->Billing* section.

![Billing](https://2566128011-files.gitbook.io/~/files/v0/b/gitbook-x-prod.appspot.com/o/spaces%2FUn1oKrw7P8P5qiTjWXjv%2Fuploads%2FqwSAlQUYh58ge6MWizFQ%2Fbilling.JPG?alt=media\&token=adbad09d-e656-4a3d-93da-76c85ba263d2)

The key information required include

| Information     | Description                                                                 |
| --------------- | --------------------------------------------------------------------------- |
| Contact Name    | Name of the Authorized Person                                               |
| Contact Number  | Phone number Authorized Person                                              |
| Billing Address | Address to be used for billing                                              |
| Type            | Flag indicating whether the Project is a *Personal* or *Enterprise* project |
| GSTIN           | GSTIN                                                                       |
| Email Id        | Email Id of the Authorized personal                                         |
| Country         | Country of origin                                                           |
| State           | State                                                                       |
| PAN             | PAN Number                                                                  |


# Botstore

Dhee.AI allows developers to sell their custom bots in the Dhee Store. To sell your agents in the Dhee Store, you need to provide information regarding the bot, including the client configurable information if any. This could be done using *AgentSettings->BotStore*.

![](https://2566128011-files.gitbook.io/~/files/v0/b/gitbook-x-prod.appspot.com/o/spaces%2FUn1oKrw7P8P5qiTjWXjv%2Fuploads%2FOZRKateAil9q1R8wXGeX%2Fagent.settings-bot-store.png?alt=media\&token=4be47089-b30e-41b4-8824-bab391830294)

The configurations are categorized into 3 key parts.

* Basic Settings
* Client Configurable Settings
* BotStore Demo Configuration

We will delve into each of the configurations to understand it better.

### Basic Settings

As the name suggests, the *Basic Settings* allows the developer to configure the basic meta-information about the bot. This include

* Name: Name for your bot.
* Description: Short description of what your bot specializes in.
* Support Email: Configured email for contacting the support team
* Support Phone Number: Registered phone number for contacting the support team
* Website: Url of the developer website
* Keywords: List of keywords associated with the bot. This is useful while consumers search for your bot in Dhee Store.
* Plan Rate: Rate Plan for consuming your bot.

![Basic Settings](https://2566128011-files.gitbook.io/~/files/v0/b/gitbook-x-prod.appspot.com/o/spaces%2FUn1oKrw7P8P5qiTjWXjv%2Fuploads%2F1ip7JRIMlORGL0g9dSc7%2Fagentsettings-botstore-basic.JPG?alt=media\&token=5391fb46-c721-4acb-b310-1e9bcd7b73ec)

Additionally, you can add images for

* Bot Introduction
* Bot Preview Image

Both images need to be less than 512KB in size. The following image types are supported

* JPG
* JPEG
* PNG (Portable Network Graphics)
* SVG (Scalable Vector Graphics)
* GIF (Graphics Interchange Format)

You can enable to *sell* your bot by enabling the *Sell in botstore* configuration on the top right corner.

### Client Configurable Settings

Often bots can be configured by client developers to suit their needs. This is done by exposing client configurable settings in your bot. The available client configurable settings can be added using *AgentSettings->BotStore\_Client-ConfigurableSettings*.

![Client configuration](https://2566128011-files.gitbook.io/~/files/v0/b/gitbook-x-prod.appspot.com/o/spaces%2FUn1oKrw7P8P5qiTjWXjv%2Fuploads%2FZgG0iWtUZIbXCuRGNl8P%2Fagentsettings-botstore-clientconfigurations.JPG?alt=media\&token=b9fe2b24-9351-480a-8795-b42ae30d62c6)

Users can provide a collection of User Configurable Settings. Each configuration setting is identified by

* Name: Unique name for identifying the setting
* Description: Description of the configuration settings
* Possible Values: Allows values for the configuration
* IsOptional: *True* if the configuration is optional. *False* otherwise.

### Botstore Demo Configuration

Botstore provides developers to browse the store and interact with the bots. The *Botstore Demo Configuration* allows the User to select the configuration values (previously defined in the *Client Configurable settings*) to be used in the demo.

![Botstore demo configuration](https://2566128011-files.gitbook.io/~/files/v0/b/gitbook-x-prod.appspot.com/o/spaces%2FUn1oKrw7P8P5qiTjWXjv%2Fuploads%2FwzPh404X26lQvMt9KspE%2Fagentsettings-botstore-democonfigurations.JPG?alt=media\&token=edc57d61-0837-4142-a327-ab7136a3d872)

If the bot doesn't have *Client Configurable Settings*, the section would be empty.

![](https://2566128011-files.gitbook.io/~/files/v0/b/gitbook-x-prod.appspot.com/o/spaces%2FUn1oKrw7P8P5qiTjWXjv%2Fuploads%2FjDyvlcZmEpOuoRARgYRY%2Fagentsettings-botstore-democonfigurations-empty.JPG?alt=media\&token=dd3daaf0-f766-4b8e-94bc-553da45f5e5d)


# Knowledge Management


# Document Reading

Dhee.Ai allows the agent to learn from documents or passages. Provided with passage(s), the agent can use the knowledge acquired from them to reply to the queries of the user.

![](https://2566128011-files.gitbook.io/~/files/v0/b/gitbook-x-prod.appspot.com/o/spaces%2FUn1oKrw7P8P5qiTjWXjv%2Fuploads%2FU49TCinxapRuYUNQQamA%2Fdocument.reading.png?alt=media\&token=b602477b-4625-4c95-9fe7-f3f241a393a3)

The passages can be added using the *KnowlegeManagement->Documents* section.

![](https://2566128011-files.gitbook.io/~/files/v0/b/gitbook-x-prod.appspot.com/o/spaces%2FUn1oKrw7P8P5qiTjWXjv%2Fuploads%2FDgY5QYdy0gWAB4QEHbV1%2Fdocument-reading-ui.JPG?alt=media\&token=4851c353-ab7e-42bc-869c-88289a2ae508)

You can add a new passage using the `+` Button.

![](https://2566128011-files.gitbook.io/~/files/v0/b/gitbook-x-prod.appspot.com/o/spaces%2FUn1oKrw7P8P5qiTjWXjv%2Fuploads%2FfYybjJneOHAVECq8crbR%2Fdocument-reading-ui-edit.JPG?alt=media\&token=17f1973a-e327-42be-9b91-ccdd95e037d6)

Passages can be auto-translated to other supported languages by enabling the *auto-translate* button.

> *The company provides flexible working hours to employees to ensure they maintain a healthy work-life balance. Employees can create their schedules and login based on their convenience*

> *In addition, the company provides all its employees 15 days of medical leaves and 12 days of casual leaves in a year.*

Agent deciphers useful knowledge from the passages and uses them for answering queries from the user. Consider the following passages.

With the learnings from the above passages, Agent can answer queries from the User regarding work-life balance and leaves.

![](https://2566128011-files.gitbook.io/~/files/v0/b/gitbook-x-prod.appspot.com/o/spaces%2FUn1oKrw7P8P5qiTjWXjv%2Fuploads%2FeY3ngF9qOx0CYI2yoLso%2Fdocument-reading-example.JPG?alt=media\&token=f7e359d7-8fb5-4ca8-b708-c1270fa45ed8)


# Frequently Asked Questions

In addition to passages, agents can learn specific information and support Frequently Asked Questions. The developer can provide different frequently asked questions on different topics and the agent could use this information to provide answers to Users.

![](https://2566128011-files.gitbook.io/~/files/v0/b/gitbook-x-prod.appspot.com/o/spaces%2FUn1oKrw7P8P5qiTjWXjv%2Fuploads%2FdCCexPAxa6RFRiHlEF3b%2FFaq.png?alt=media\&token=0d34ef10-20e0-4a5f-9f9d-85599c61c738)

The needed information can be added using the *KnowledgeManagement->FrequentlyAskedQuestions* section.

![](https://2566128011-files.gitbook.io/~/files/v0/b/gitbook-x-prod.appspot.com/o/spaces%2FUn1oKrw7P8P5qiTjWXjv%2Fuploads%2FPp3DqyhAHR0H9Ld07twM%2Ffaq-main.JPG?alt=media\&token=f3a35218-6d08-4392-bc68-7dda9722094f)

Each question supports auto-translate, which can be enabled using the *Auto-Translate* radio button.

![](https://2566128011-files.gitbook.io/~/files/v0/b/gitbook-x-prod.appspot.com/o/spaces%2FUn1oKrw7P8P5qiTjWXjv%2Fuploads%2FOUOobM281SzMjdMJhYQU%2Ffaq-autotranslate.JPG?alt=media\&token=04702d97-0a90-4a61-abfb-2c9c6e55a42c)

For each question, the developer can provide variations using the *Variation* button.

![](https://2566128011-files.gitbook.io/~/files/v0/b/gitbook-x-prod.appspot.com/o/spaces%2FUn1oKrw7P8P5qiTjWXjv%2Fuploads%2FObTzMg0l9WiUc8Qvlkxc%2Ffaq-main-variations.JPG?alt=media\&token=1a090092-b5de-4229-8470-e6d52d411952)

Variations are possible different phrasing of the same question. This is highly useful as different users might use different approaches to ask the same question.

The developer can provide *answers* to the questions as well using the *Answers* button. Similar to the questions, the answers also support auto-translation.

![](https://2566128011-files.gitbook.io/~/files/v0/b/gitbook-x-prod.appspot.com/o/spaces%2FUn1oKrw7P8P5qiTjWXjv%2Fuploads%2FyMJybJk4HHsInix8bJwN%2Ffaq-answers.JPG?alt=media\&token=a4671821-cd47-40a5-9087-00e220f9221c)

&#x20;If the user wants to enter a question in a specific language, he can use the Language Dropdown at the top left corner.


# Intents and Automation

{% content-ref url="/pages/BrnwyYojjtsFcX1aIS0d" %}
[Intents](/platform-reference/intents-and-automation/intents)
{% endcontent-ref %}

{% content-ref url="/pages/iHhAoSbvEFWGJyMxvWQA" %}
[Skills/DSM](/platform-reference/intents-and-automation/skills-dsm)
{% endcontent-ref %}

{% content-ref url="/pages/lMV4fNoFgtRoRCGWilMO" %}
[Backend API](/platform-reference/intents-and-automation/backend-api)
{% endcontent-ref %}


# Intents

Intents define the goals the Customer wants to achieve when he/she interacts with our bot.

The intent definition should include the triggers which help in identifying the intent during the conversation with the Customer. Once an intent is identified by the chatbot, the intent definition should be complete with the information (entities) it needs to have for completing the action.

## Create User Intent

You can create a new User Intent using the *IntentsAndAutomation->Intents* menu.

![Create User Intent](https://2566128011-files.gitbook.io/~/files/v0/b/gitbook-x-prod.appspot.com/o/spaces%2FUn1oKrw7P8P5qiTjWXjv%2Fuploads%2FbJNKXtIn7CwlebB2ZbOg%2Fintents-and-automation.PNG?alt=media\&token=e78d96f1-72a6-470c-aaa0-51019ad712fa)

The above list shows all the configured intents for your current project. You can create a new *User Intent* using the *+* (Plus) button. Each User Intent requires

* **Name** : Unique name to identify the intent
* **Description** : Description for the intent
* **Is Top Level** : Specifies if the intent is a top-level intent.

## Edit User Intent

The developer can *edit* an existing User Intent meta-information using the *pen* icon in each row.

![Edit User Intent](https://2566128011-files.gitbook.io/~/files/v0/b/gitbook-x-prod.appspot.com/o/spaces%2FUn1oKrw7P8P5qiTjWXjv%2Fuploads%2FsUADg4uzlgPDErCSvk0y%2Fedit-intent.PNG?alt=media\&token=c316b9c4-3fcf-470a-b8f8-d68101ee269c)

Use the *Save* to save the active changes.

## Delete User Intent

The *Intents Management Screen* also provides the developer with deleting existing User Intents. The developer can use the *Delete* button corresponding to the Intent to delete it.

![Delete User Intent ](https://2566128011-files.gitbook.io/~/files/v0/b/gitbook-x-prod.appspot.com/o/spaces%2FUn1oKrw7P8P5qiTjWXjv%2Fuploads%2FpBulhB5xXvIl0FqhKotQ%2Fdelete-user-intent.PNG?alt=media\&token=9b5a0617-cf27-4429-ac64-11bef8652039)

On attempting to delete, the Developer would be prompted for a confirmation to avoid accidental deletion.

## Delete All

Additionally, the User has an option to delete all intents together. This is useful when Developer needs to delete multiple intents. The *Delete All* button on the top right of the *Intent List* allows the developer to delete all intents. As with the individual deletion of intents, the developer would be prompted for confirmation of his actions.

![Delete All User Intents](https://2566128011-files.gitbook.io/~/files/v0/b/gitbook-x-prod.appspot.com/o/spaces%2FUn1oKrw7P8P5qiTjWXjv%2Fuploads%2FA832jelAZOu5APeCJBAl%2Fdelete-all-intents.PNG?alt=media\&token=acec41de-f413-4163-869d-f02cf0cc84ad)

## Additional Reading

{% content-ref url="/pages/HiEOHZIBwvmozuuAhJP5" %}
[Slots](/platform-reference/intents-and-automation/intents/slots)
{% endcontent-ref %}

{% content-ref url="/pages/On3qzIwKawwb40rP3Dob" %}
[Triggers](/platform-reference/intents-and-automation/intents/triggers)
{% endcontent-ref %}

{% content-ref url="/pages/KNUyjTMjReDhOC80pVIc" %}
[Stop Triggers](/platform-reference/intents-and-automation/intents/stop-triggers)
{% endcontent-ref %}


# Slots

Slots describe the input and output fields associated with the intents, which are used for processing the intent. These might also include the inputs for the Web API requests, if any, associated with the intent. You can define the Slots by using the slot button under the Action column.&#x20;

![Use Slot Button in Intents and Automation](https://2566128011-files.gitbook.io/~/files/v0/b/gitbook-x-prod.appspot.com/o/spaces%2FUn1oKrw7P8P5qiTjWXjv%2Fuploads%2FT7GF1vN9t3EfelRcznmZ%2Fintents-and-automation.PNG?alt=media\&token=a5dbc457-9553-4feb-aea3-2bd4ca15db19)

### **Define Slots**

![Slots](https://2566128011-files.gitbook.io/~/files/v0/b/gitbook-x-prod.appspot.com/o/spaces%2FUn1oKrw7P8P5qiTjWXjv%2Fuploads%2FLuUr6YfwXOPXGKUFfL8G%2FSlots-main-ui.JPG?alt=media\&token=32eedb9e-5d91-4060-88d6-05fae051746a)

Slots UI displays all the available (created) slots. You can create a new slot using the \`+\` button on the top right corner. Each slot are characterized by

* Name
* Display Name&#x20;
* Slot Type
* Custom Entity Type
* Allow Multiple
* Delay Template
* Only English
* Last Option
* Sensitive
* Actions

Name is a unique identifier of the type string to identify the slot. The slot can also have a display name. Slots Type defines the data type of the slot.&#x20;

Available data types include

* INTEGER
* DATE&#x20;
* TIME&#x20;
* NAME&#x20;
* ARTEFACT&#x20;
* LOCATION
* BOOLEAN
* CODE
* PAST\_DATE
* FUTURE\_DATE
* ADDRESS
* RELATIONSHIP
* PASS\_THROUGH
* PHONE\_NUMBER
* EMAIL\_ID
* NUM\_PLATE
* EVENTS
* SYSTEM FILLED
* QUERY\_PHRASE

{% hint style="info" %}
In addition to the in-build types, Dhee.AI also supports custom types. If the developer needs to select a Custom Type, the *\_Slot Type\_* needs to be set to *\_Custom\_* and *\_Custom Entity Type\_* needs to be set the user-defined custom entity type
{% endhint %}

The rest of the configuration options include

| Flag           | Description                                                                                                      |
| -------------- | ---------------------------------------------------------------------------------------------------------------- |
| Allow Multiple | If *true* indicates a list of values                                                                             |
| Delay Template | if *true* Entity based slot extraction has priority over template based extraction of slots                      |
| Only English   | If *true*, prioritize English values over the language of conversation. Useful for handling names                |
| Last Option    | If a conflict exists for the candidate for a slot, prefer capturing other slots before capturing the current one |
| Sensitive      | Mask the slot value before storing in conversation logs                                                          |

### **Templates**

In natural language, users often provide multiple information in a single sentence, especially in commonly used phrases. Consider the following examples

```
// Captures email id and phone number
You can contact me on a*****.gmail.com or 98******

// Captures Start and End Date of leaves
I would like to take a vacation from 24th till 29th of this month
```

Templates allow multiple slots to be captured together from User utterances. In the above examples, multiple slots can be captured from the slot from single sentences. To define a template, select the \`Template\` button under the *\_Action\_*.

![](https://2566128011-files.gitbook.io/~/files/v0/b/gitbook-x-prod.appspot.com/o/spaces%2FUn1oKrw7P8P5qiTjWXjv%2Fuploads%2Fg2y1aI9Nk1QpqV304Wnj%2FSlots-main-ui.JPG?alt=media\&token=63d62239-8920-475a-9fb1-a7bad2b2c809)

Templates allow multiple slots to be captured together from User utterances. In the above examples, multiple slots can be captured from the slot from single sentences. In order to define a template, select the `Template` button under the *Action*.

![](https://2566128011-files.gitbook.io/~/files/v0/b/gitbook-x-prod.appspot.com/o/spaces%2FUn1oKrw7P8P5qiTjWXjv%2Fuploads%2F0bCDiweKpcD30m9ym3D7%2Fslots-templates.JPG?alt=media\&token=9db66d33-e3e6-487e-9cfb-64c049c85cf9)

Templates are defined by using the `$slotName` syntax for capturing slots. For example, assuming we have *startDate* and *endDate* as our slot names, a template in a leave management application might look like

```
leaves from ${startDate} to ${endDate}
```

The Templates can be instructed to support multilingual functionality if the bot was designed to the multilingual. You can enable the functionality by using the *Auto-translate* flag.

We can use the *Templates* to read multiple inputs together from user utterances. For example, for the *startDate*, we can define the template as "*leaves from ${startDate} to ${endDate}*". This would ensure the *startDate* and *endDate* are filled when the user utterance is similar to any of the following.

### Prompts

In addition, you can also define *Prompts* for each of the slots if the User fails to provide the required inputs. These are the messages which the chatbot would ask the user when there is missing information. For example, for the *startDate* the prompt could be defined as

```
From when are you planning to go on leave?
```

![](https://2566128011-files.gitbook.io/~/files/v0/b/gitbook-x-prod.appspot.com/o/spaces%2FUn1oKrw7P8P5qiTjWXjv%2Fuploads%2Fff226OYOP59XPUMNDbHe%2Fslots-prompts_1.JPG?alt=media\&token=563564cf-1779-4a4a-a816-203e603b98f4)

Dhee.AI also allows configuring slots using prompts that show predefined values. For example, We could *prompt* the user for specifying the reason for leave application using predefined custom values. For example,

```
OK. Why do you want the leave ? [[EXT:BUTTON|Medical|Casual]]
```

This would show a prompt including the possible reasons for leave as shown in the image below.

![Predefined values in Prompt](https://2566128011-files.gitbook.io/~/files/v0/b/gitbook-x-prod.appspot.com/o/spaces%2FUn1oKrw7P8P5qiTjWXjv%2Fuploads%2FtwMGTE9GwPt5Hywjg60B%2Fprompt-leave-reason.JPG?alt=media\&token=6cab3fa1-77f6-4659-8820-27f47e1f5a0e)


# Triggers

Triggers are parts of utterances that enable the bot to identify the intent to be used. Triggers can be defined using the *Trigger* Button (under *Action*) from *IntentsAndAutomation->Intents*.

![Use Trigger button](https://2566128011-files.gitbook.io/~/files/v0/b/gitbook-x-prod.appspot.com/o/spaces%2FUn1oKrw7P8P5qiTjWXjv%2Fuploads%2FnlRvjqpyTiqSZ76ycq2Z%2FIntents-automation-trigger-button.JPG?alt=media\&token=57d52301-c77a-40f9-96fb-c740d9603088)

Triggers allow you to define a collection of sentences or phrases which would be considered as a trigger for the intent. These could be explicit statements that help identify the intents or could be indirect references.&#x20;

![Sample Triggers for a leave application](https://2566128011-files.gitbook.io/~/files/v0/b/gitbook-x-prod.appspot.com/o/spaces%2FUn1oKrw7P8P5qiTjWXjv%2Fuploads%2FUcJNG57EfzVISmjy5WoJ%2FIntents-automation-trigger.JPG?alt=media\&token=05839078-4225-4dd4-8710-c4c106599c43)

For example, for an intent for applying for leave, the user can interact with the chatbot in any of the following ways.

```
i need a leave
i am sick
I am planning some time off
```

Each of the above describes different utterances Users might use to interact with the chatbot and could be used to identify the intent. You can also select to *auto translate* the texts to support a multilingual chatbot.

{% hint style="info" %}
Phrases which are three words or longer can be picked up based on it's meaning from any sentence by Dhee. Make use of it to do more by writing less. Sticking to phrases consistently within a project helps improve the overall accuracy of the bot too.\
\
E.g, Add "take a sick leave" instead of "I would like to take a sick leave"
{% endhint %}


# Stop Triggers

*Stop triggers* are words or phrases that direct the chatbot to cancel the intent. These are helpful to cancel the current intent in mid-ways. You can configure the stop triggers using the *Stop Trigger* button under *Action*.

![Stop Triggers](https://2566128011-files.gitbook.io/~/files/v0/b/gitbook-x-prod.appspot.com/o/spaces%2FUn1oKrw7P8P5qiTjWXjv%2Fuploads%2Fm4HpW21CPoQDMNcTwPAL%2Fintent-stop-trigger-ui.JPG?alt=media\&token=e43632fd-fc65-4c46-b631-618910219d1d)

When a bot detects a stop trigger, it would cancel the intent which was previously detected based on *Triggers*.

![Stop Trigger in Action](https://2566128011-files.gitbook.io/~/files/v0/b/gitbook-x-prod.appspot.com/o/spaces%2FUn1oKrw7P8P5qiTjWXjv%2Fuploads%2FvWHJ00vuxfXLo7JbafwL%2Fintent-stop_trigger.JPG?alt=media\&token=8532a4ec-d867-44df-9241-fd063d30e32f)


# Special Intents

Intents which have predestined intentions

Some of the intents name are wired by convention to be invoked (if there are defined) at certain states of the conversations. For example, an intent with the name "*ConversationFeedbackIntent*" will be invoked during the end of a conversation to collect the feedback (additional enabling is required in the  Advance Settings).

Given below are the list of such special intents.

**AUTO\_ESCALATION\_INTENT**\
\
If you want to ask some queries or do some operations before escalating a chat to the supervisors, we can attain that by creating an intent by the name '*AUTO\_ESCALATION\_INTENT*'.

<figure><img src="https://2566128011-files.gitbook.io/~/files/v0/b/gitbook-x-prod.appspot.com/o/spaces%2FUn1oKrw7P8P5qiTjWXjv%2Fuploads%2FOqQinEmKiK9GRveBvRY2%2Fauto-escalation-intent.png?alt=media&amp;token=45c1b938-b0a4-4ddb-bf4a-321f9063636d" alt=""><figcaption></figcaption></figure>

**ConversationFeedbackIntent**\
\
If you want to collect the valuable feedback of the user at the end of a conversation, you have to create an intent by the name '*ConversationFeedbackIntent*' and enable the setting *COLLECT\_FEEDBACK* under Advance Settings.  As a last step, use the dialog action *STORE\_FEEDBACK* to facilitate the storage of feedback.

You can find all the feedbacks under C-SAT sections of Reports.

<figure><img src="https://2566128011-files.gitbook.io/~/files/v0/b/gitbook-x-prod.appspot.com/o/spaces%2FUn1oKrw7P8P5qiTjWXjv%2Fuploads%2Fdvjze4DM3W4S7D89JUAQ%2Ffeedback-intent.png?alt=media&amp;token=de28756d-a6cd-4c1e-a49b-5e600098df57" alt=""><figcaption></figcaption></figure>


# Skills/DSM

![](https://2566128011-files.gitbook.io/~/files/v0/b/gitbook-x-prod.appspot.com/o/spaces%2FUn1oKrw7P8P5qiTjWXjv%2Fuploads%2FI3tA2RckZlHxCZMRlobo%2Fconfiguration.workflow.png?alt=media\&token=fb7c11d6-f26c-4a01-8131-69aed7ad561a)

The *IntentsAndAutomation->Skills/Dsm* allows you to define the set of actions and the order of execution of these actions for completing the objectives of an *intent*.

![](https://2566128011-files.gitbook.io/~/files/v0/b/gitbook-x-prod.appspot.com/o/spaces%2FUn1oKrw7P8P5qiTjWXjv%2Fuploads%2F15znCU1OD98OijPoH0D5%2Fskill-dsm.JPG?alt=media\&token=07a72c25-0845-407b-be59-622d4495a817)

Dhee.AI provides two flexible approaches to define the automation step.

{% content-ref url="/pages/ylEKxQcAwPYvwMinboVe" %}
[Dialog State Transition](/platform-reference/intents-and-automation/skills-dsm/dialog-state-transition)
{% endcontent-ref %}

{% content-ref url="/pages/z29D7aTHCliTAPLCnHiv" %}
[Dialog Workflow](/platform-reference/intents-and-automation/skills-dsm/dialog-workflow)
{% endcontent-ref %}


# Dialog Actions

To speak is to act

Conversational interactions of the virtual agent, especially when running a business process can be broken down into discrete dialog actions. For example, prompt for an input, what to expect during a turn of a conversation etc.

Please find the dialog actions that Dhee supports using which you can define the dialog transitions as described in further automation chapters.

<table><thead><tr><th width="329">Function</th><th>Description</th><th data-hidden></th></tr></thead><tbody><tr><td>CALL_API</td><td>To make a call to a backend REST API</td><td></td></tr><tr><td>GET</td><td>To expect a slot value while displaying the prompt</td><td></td></tr><tr><td>EXPECT (Silent GET)</td><td>To expect a slot value without prompt</td><td></td></tr><tr><td>SPEAK</td><td>To display a message on the chatbot</td><td></td></tr><tr><td>SPEAK_N_EXIT</td><td>To display a message and exiting an intent</td><td></td></tr><tr><td>SPEAK_4_EACH</td><td>To speak multiple messages with the messages comma separated </td><td></td></tr><tr><td>SET</td><td>To equate or initialise a value to a slot  </td><td></td></tr><tr><td>DO</td><td>To call upon another intent</td><td></td></tr><tr><td>TAKE_PAYMENT</td><td>To take the payments from end users</td><td></td></tr><tr><td>COMMAND</td><td>To perform a specific command, for example, <em>COMMAND END_CONVERSATION</em> to end the conversation</td><td></td></tr><tr><td>COMMAND_N_TEXT</td><td>To perform both command and text together</td><td></td></tr><tr><td>ESCALATE</td><td>To escalate the conversation to supervisors</td><td></td></tr><tr><td>WAIT</td><td>To add a waiting period in the chatbot</td><td></td></tr><tr><td>EMAIL</td><td>To perform emailer action </td><td></td></tr><tr><td>SAVE_2_SHEET</td><td>Save to spreadsheets action</td><td></td></tr><tr><td>SAVE_2_THIS_SHEET</td><td>Save to spreadsheets action from multiple intents</td><td></td></tr><tr><td>STORE_FEEDBACK</td><td>To store the user feedback</td><td></td></tr></tbody></table>

Find below the syntax for some the functions

**SAVE\_2\_SHEET**

SAVE\_2\_SHEET {slot 1} {slot 2} .. {slot K}\
The above command is to be called once per run of a top level intent. The location to find these spreadsheets is - Reports & Invoice/ Live Statistics/Output Spreadsheets

**SAVE\_2\_THIS\_SHEET**&#x20;

SAVE\_2\_THIS\_SHEET {sheet name} {slot 1} {slot 2} .. {slot K}\
The advantage of this command over the existing intent specific sheets is that you can write to the same sheet from multiple intents (by using the same arbitrarily set name for the sheet from those intents' DSMs)

**TAKE\_PAYMENT**&#x20;

TAKE\_PAYMENT ${amount slot} INTO {payment status slot}\
*amount slot* will be holding the value of amount to be asked from user, and can be replaced with any slot name which you use for the purpose.&#x20;

Similarly, *payment status slot* will hold Boolean result of the transaction (true or false). Can be replaced with any slot name which you use for the purpose.

**COMMAND**

* For signalling javascript events to parent pages use DSM Transition function -\
  COMMAND EVENT (any event code you want to pass, without these brackets)
* For closing widget and ending conversation -\
  COMMAND END\_CONVERSATION

**COMMAND\_N\_TEXT**&#x20;

COMMAND\_N\_TEXT \<COMMAND> \<MLT>\
The advantage of this command over the *COMMAND* is that we can now send command and text together. For example, *COMMAND\_N\_TEXT RingAlarm TimeForMeetingMLT*

**EMAIL**

EMAIL emailId1|emailId2|emailIdN subjectMltName contentMltName\
subjectMltName should contain the subject of the email and contentMltName should contain the contents of the email

**ESCALATE**

* To escalate the conversation for every supervisor -\
  ESCALATE
* To escalate to a specific domain (domain-wise escalation) -\
  ESCALATE domainName


# Dialog State Transition

Dialog State Transitions allows developers to define and specify transitions between states.

Each State Transition is identified by a Name and a description.

![](https://2566128011-files.gitbook.io/~/files/v0/b/gitbook-x-prod.appspot.com/o/spaces%2FUn1oKrw7P8P5qiTjWXjv%2Fuploads%2F7g5sAqAhPxqLrL8C1lCO%2Fdialog-state-transition.JPG?alt=media\&token=5e1359cc-42cf-4d01-83d5-d89b70b3e4fe)

### Map Intent

Similar to Dialog Workflow, the User can map the state Transition to an *Intent* using *Intent* button under the Action.

![](https://2566128011-files.gitbook.io/~/files/v0/b/gitbook-x-prod.appspot.com/o/spaces%2FUn1oKrw7P8P5qiTjWXjv%2Fuploads%2FyDKRqyzCLuzDEvgr3L4S%2Fdialog-workflow-map-intent.JPG?alt=media\&token=9a459471-5ee8-4fb2-822e-3db19535cfcc)

This would display all the *intents* you have previously defined. The user can select an intent he would like to map to the current workflow. Once mapped, the details of the mapping would be shown including the *Handler Type*.

![](https://2566128011-files.gitbook.io/~/files/v0/b/gitbook-x-prod.appspot.com/o/spaces%2FUn1oKrw7P8P5qiTjWXjv%2Fuploads%2FZn20ap1V7rmgqOrA3p73%2Fdialog-workflow-map-intent_details.JPG?alt=media\&token=acca4175-9c2b-4696-8d97-37df4d94ae86)

Intent cannot be mapped to more than one workflow.

![](https://2566128011-files.gitbook.io/~/files/v0/b/gitbook-x-prod.appspot.com/o/spaces%2FUn1oKrw7P8P5qiTjWXjv%2Fuploads%2FsrkAsEMuVerGLon3CbWJ%2Fdialog-workflow-map-intent_maperror.JPG?alt=media\&token=a186ce82-9eae-41df-918e-e05bf1e7345e)

#### Transitions


# Slot State

While performing dialog actions we need to set the state of various slot also, so that intended slot hold intended values.&#x20;

Please find the slot state that Dhee supports using which you can define the states of a slot.

| Slot State       | Description                                              |
| ---------------- | -------------------------------------------------------- |
| NONE             | To expect a value from the slot                          |
| ANY              | Neutral sate / not expecting any value                   |
| USER\_DONT\_KNOW | User is aware of the slot                                |
| PRESENT          | Slot value is present                                    |
| VALUE            | Slot contain a particular value. For example, VALUE true |
| REGEX            | Slot value passes a certain REGEX condition              |


# Dialog Workflow

Dialog Workflow is a graph-based workflow editor which provides a WYSWYG experience to the developer while designing the workflow. It is a highly recommended approach when designing the intent automation as it provides a visual representation of the entire flow of execution.

![Dialog Workflow](https://2566128011-files.gitbook.io/~/files/v0/b/gitbook-x-prod.appspot.com/o/spaces%2FUn1oKrw7P8P5qiTjWXjv%2Fuploads%2F8mZBNOT5B3H0cU6jgsJF%2Fdialog-workflow.JPG?alt=media\&token=030af391-e9af-4c21-8f42-b25bc12382e4)

Each workflow is identified by a unique name and a description. The name needs to be a unique string.

### Map Intent

The workflow can be associated with an *intent* using the *Map to intent* button under the *Action/Configuration*.

![Select an Intent](https://2566128011-files.gitbook.io/~/files/v0/b/gitbook-x-prod.appspot.com/o/spaces%2FUn1oKrw7P8P5qiTjWXjv%2Fuploads%2Foc2BFwRMsqeAWEEbCCNT%2Fdialog-workflow-map-intent.JPG?alt=media\&token=c364f9f3-1c59-431b-ab34-7c2591ef4712)

This would display all the *intents* you have previously defined. Users can select an intent they would like to map to the current workflow. Once mapped, the details of the mapping would be shown including the *Handler Type*.

![Mapped intent details](https://2566128011-files.gitbook.io/~/files/v0/b/gitbook-x-prod.appspot.com/o/spaces%2FUn1oKrw7P8P5qiTjWXjv%2Fuploads%2F8nqFQORkG5AGqP6WTaP1%2Fdialog-workflow-map-intent_details.JPG?alt=media\&token=6da3a83a-b9f7-45cb-b72a-4c18e13f133e)

Intent cannot be mapped to more than one workflow.

![Cannot map one intent to more than one workflow](https://2566128011-files.gitbook.io/~/files/v0/b/gitbook-x-prod.appspot.com/o/spaces%2FUn1oKrw7P8P5qiTjWXjv%2Fuploads%2FebFTvfTGXMvrDQE0bWvd%2Fdialog-workflow-map-intent_maperror.JPG?alt=media\&token=6fbf3077-3571-45a3-8eb5-f472a39c7093)

### View/Edit Workflow

Having mapped the intent to the newly created workflow, it is now time to define the actual workflow. Use the *View/Edit Workflow* button under the *Action/Configuration* column to open the Workflow Editor.

![Workflow Editor](https://2566128011-files.gitbook.io/~/files/v0/b/gitbook-x-prod.appspot.com/o/spaces%2FUn1oKrw7P8P5qiTjWXjv%2Fuploads%2FE6YEjtCzhhpZXERmMOIJ%2Fdialog-workflow-editor-ui.JPG?alt=media\&token=ade3dda2-f3ab-4db5-a1a5-1093ebf17ac2)

> Note that the workflow editor will prohibit the user from defining the workflow if the Intent is not mapped. The Workflow Editor mandates the intent to be mapped before defining the workflow.

The Workflow Editor provides an easy WYSWYG editor for creating workflows with easy flow charts. The Editor comprises two key components.

* Dialog Functions
* Editor View

The Dialog Functions provides the available functions which can be executed by the Workflow Automation. This also includes an explicit *Start* and *Exit* function, which identifies the start and end of the workflow.

![Actions and Connectors](https://2566128011-files.gitbook.io/~/files/v0/b/gitbook-x-prod.appspot.com/o/spaces%2FUn1oKrw7P8P5qiTjWXjv%2Fuploads%2FtWAm3xz53tbaTXHl0d5B%2Fdialog-workflow-editor-actions.JPG?alt=media\&token=a47ae48e-3a53-490f-b0f0-dec49c61064a)

The key functions available are

* START : Signals the start of the workflow.
* EXIT : Signals the end of the workflow.
* IF : Specifies an if condition
* CALLAPI : \_Makes calls to an Rest Endpoint
* GET : Recieves the input from User
* SPEAK : Provide a response to the User
* SET : Set a slot's value, Eg SET validate = true ;
* DO : Call a sub intent. The skill linked to that intent will be called.
* SPEAK\_4\_EACH : If an API sets a parameter with value as List of strings, SPEAK\_4\_EACH can make the bot speak all the values in the list. For Example, SPEAK\_4\_EACH listOfShortListedCandidates ;
* WAIT : WAITS for the given micro seconds before executing next command. For Example, WAIT 2000 ;
* EXPECT : Expects a slot or a comma separated set of slots to be given by the user (there won't be a prompt utterance to ask for the slot in this case)
* TAKE\_PAYMENT : Takes payment and updates status to a slot
* ESCALATE : Escalate the conversation to the supervisor
* EMAIL : Send an email
* SAVE2\_SHEET : Save values to the spreadsheet. Spreadsheet is available in Reports Section

In addition to the Dialog Functions, the Editor also supports *Connectors* which describe the transition or relation between the actions. These include

* STRAIGHT
* NONE
* ANY
* USER\_DONT\_KNOW
* PRESENT
* VALUE

The Editor View displays the currently configured workflow. User needs to Drag/move the workflow Action from the DialogFunctions Ui to Editor View.

![Sampel Workflow](https://2566128011-files.gitbook.io/~/files/v0/b/gitbook-x-prod.appspot.com/o/spaces%2FUn1oKrw7P8P5qiTjWXjv%2Fuploads%2FAxE6OPYrLQ8ZF8PSDoas%2Fdialog-workflow-editor-savetoexcel-complete.JPG?alt=media\&token=4a2f2ce2-bfc2-4985-b2f8-a31809860083)


# Skill API

Want to handle a Dialog State Machine completely in the backend?

Skill API allows the developers to design the flow for an Intent completely in the backend using REST API.

We can define a Skill API by defining it under ***Backend API*** section.

The syntax for a Skill API is to suffix the word "Skill" in front of the Intent name -> \
${Intent-Name}Skill

<figure><img src="https://2566128011-files.gitbook.io/~/files/v0/b/gitbook-x-prod.appspot.com/o/spaces%2FUn1oKrw7P8P5qiTjWXjv%2Fuploads%2FWQMp3JkkAacFCal4cHXq%2Fskill-api.png?alt=media&amp;token=34f1dad7-8728-45b2-a609-863eb27c658f" alt=""><figcaption></figcaption></figure>


# Backend API

The *\_IntentsAndAutomation->BackendAPI\_* allows developers to define the supported backend APIs the chatbot needs to interact with.

![](https://2566128011-files.gitbook.io/~/files/v0/b/gitbook-x-prod.appspot.com/o/spaces%2FUn1oKrw7P8P5qiTjWXjv%2Fuploads%2FxE7Rrpo2gQMOR3UFpo4d%2Fconfigure-api.JPG?alt=media\&token=1a840379-63e9-4259-8507-dd1a669de800)

The *\_endpoints\_* need to be defined and registered with the Dhee.AI system before being consumed by our workflow.

Use the '+' Button to register a new endpoint. You would be required to provide

| Fields   | Description                                |
| -------- | ------------------------------------------ |
| Url Name | An unique string to identify the endpoint. |
| Uri      | The actual URI of the endpoint             |
| Uername  | Username to use to access the uri          |
| Password | Password to be used                        |

&#x20;


# Extended Message Types

Explore a spectrum of dynamic message types to elevate your chatbot's interactive capabilities with Dhee's Extended Message Types.

Dhee offers a diverse range of extended message types to elevate your chatbot's interaction capabilities. Explore the following message types supported by Dhee:

**BUTTON**

* Format: `[[EXT:BUTTON|{button-1}|{button-2}|....]]`
* Use: Display items in a clickable button format for further user interaction upon click.

**UNORDERED\_LIST**

* Format: `[[EXT:UNORDERED_LIST|{item-1}|{item-2}|....]]`
* Use: Present items in a non-ordered, user-friendly format.

**INTERACTIVE\_LIST**

* Format: `[[EXT:INTERACTIVE_LIST|{item-1}|{item-2}|....]]`
* Use: Similar to UNORDERED\_LIST but with interactive click options for each item.

**LINK**

* Format: `[[EXT:LINK|{URL-text}^{full-URL}]]`
* Use: Redirect users to an external URL, displaying specified text for the link

**FILEUPLOAD**

* Format: `[[EXT:FILEUPLOAD|{slot-name}|{MIME-types}^{MIME-types}|{file-max-size}]]`
* Use: Enable file uploads, specifying slot names, allowed MIME file types, and maximum file size.
* *slot name* is the name of the slot where the uploaded file will be stored.
* *MIME-types* is the allowed MIME file type for upload. Foe example, *image^pdf.*
* *file-max-size* is the maximum allowed size for the file uploaded.

**CUSTOMTEXT**

* Format: `[[EXT:CUSTOMTEXT|{some-text}]]`
* Use: Customize user input prompts, ideal for scenarios like obtaining OTPs.
* *some-text* will be the text displayed inside the text area.

**VIDEO**

* Format: `[[EXT:VIDEO|{video-URL}]]`
* Use: Embed videos directly within the chatbot by providing the complete video URL.

**DOCUMENT**

* Format: `[[EXT:DOCUMENT|${document-URL}^${document-caption}^${document-file-name}]]`
* Use: Facilitate document downloads within the chatbot, specifying document URLs, captions, and optional file names.
* *document-caption* is a text to be shown adjacent to the document&#x20;
* *document-file-name* is the name of the file when the document is downloaded. This is optional, default filename being the caption itself.

These extended message types offer versatile communication options to enhance user interactions and deliver rich content seamlessly within the chatbot environment.


# Entities And Other Data

Elevate your chatbot's linguistic prowess and data precision with Dhee's Multilingual Support for Entities and Responses

In this versatile section, Dhee offers a robust set of tools to empower your chatbot with multilingual capabilities. Explore the following sub-sections to enhance your bot's language flexibility and precision:

**Entities**

Add language-specific or multilingual project-related entities to fine-tune your bot's understanding of user input.

**Agent Responses**

Customise various responses your bot can provide, ensuring tailored interactions with users.

**Directive Responses**

Craft personalised input and output responses to meet the unique needs of your project.

**Translations**

Seamlessly translate content from one language to another to expand your bot's linguistic reach.

**Query Substitutions**

Substitute different words or queries with specific text or queries, enhancing user comprehension and interaction.

**Abbreviation Text**

Create substitutions for abbreviated texts, enabling clearer communication in your chatbot conversations.

Unlock the potential of multilingual support and data manipulation to create a chatbot that excels in understanding and engaging users across diverse languages and contexts.


# Entities

Empower your chatbot with tailored language understanding through customisable entities

In this section, you have the flexibility to define and manage entities related to your project or client, enhancing your chatbot's ability to understand and respond effectively

Whether you're working with language-specific entities, multilingual variations, or custom entity types, this section empowers you to optimize your chatbot's comprehension and engagement in diverse contexts.


# Multilingual Entities

Unlock multilingual support and expand your chatbot's capabilities with versatile entities

Dhee.AI empowers chatbots to seamlessly handle named entities while interacting with users across various languages. Within the Entities & Other Data section, specifically under Multilingual Entities, you can define and manage these multilingual entities effortlessly.

![](https://2566128011-files.gitbook.io/~/files/v0/b/gitbook-x-prod.appspot.com/o/spaces%2FUn1oKrw7P8P5qiTjWXjv%2Fuploads%2Fb8JiLGoeXealdejqrvIW%2Fmulti-lingual-entities.JPG?alt=media\&token=edf17fa9-eae5-440f-ba1a-5f9b6f8ca20c)

Here's what you need to know:

**Defining Multilingual Entities**

* Specify key details including the language, domain, named entity, gender, and sub-type for each multilingual entity.
* Supported named entities encompass a wide range, from locations and organizations to dates, times, and more.
* You can even create custom entities tailored to your project's unique needs, selecting "Developer Defined Entity."

**Generating Multilingual Translations**

* Use the "+" button to add an entity in English.
* Upon saving, the Indic text is automatically generated for multilingual support.

**Manual Translation Override**

* If you wish to manually define the Indic text or any other translation, enable the Review flag. This allows administrators to verify translations later.

**Efficient Management**

* The user-friendly UI offers filtering and search functionalities, streamlining the process of finding and managing specific entities.

With Multilingual Entities, you're equipped to create a chatbot that excels in understanding and responding to users in multiple languages, enhancing the user experience across diverse linguistic contexts.


# Language Specific Entities

Fine-tune your chatbot's language-specific responses for a more personalised interaction

In contrast to multilingual entities, some entities are inherently language-specific and do not require translation into other languages. Within the Entities & Other Data section, under Language Specific Entities, users can define these language-specific entities with precision.

![](https://2566128011-files.gitbook.io/~/files/v0/b/gitbook-x-prod.appspot.com/o/spaces%2FUn1oKrw7P8P5qiTjWXjv%2Fuploads%2F83UxuRAQOzTCdp3qr8GR%2Flanguage-specific-entities.JPG?alt=media\&token=5e64611a-3d0f-4edf-b285-81f6da2cc2c9)

Here's how:

**Defining Language Specific Entities**

* Specify the language, domain, and custom entity type for each language-specific entity.
* Each entity is distinguished by essential attributes, including text, language-specific entity designation, sub-type, gender, and custom type.

With Language Specific Entities, you have the flexibility to tailor your chatbot's understanding and responses to specific languages, ensuring accuracy and relevance in interactions conducted within distinct linguistic contexts.


# Custom Entity Types

Define custom data types to enhance chatbot intelligence and context-awareness

Dhee.AI comes equipped with built-in support for various data types, offering versatility and precision in handling user input. These data types include:

* INTEGER
* DATE
* TIME
* NAME
* ARTEFACT
* LOCATION
* BOOLEAN
* CODE
* PAST\_DATE
* FUTURE\_DATE
* ADDRESS
* RELATIONSHIP
* PASS\_THROUGH
* PHONE\_NUMBER
* EMAIL\_ID
* NUM\_PLATE
* EVENTS
* SYSTEM FILLED
* QUERY\_PHRASE

Additionally, Dhee.AI grants users the flexibility to define their own Custom Entity Types to align with specific intents and requirements. These Custom Entity Types can be established within the Entities & Other Data section, under Custom Entity Types.

![Custom Entity Type](https://2566128011-files.gitbook.io/~/files/v0/b/gitbook-x-prod.appspot.com/o/spaces%2FUn1oKrw7P8P5qiTjWXjv%2Fuploads%2FwtEebmQthoqEPssGfd8L%2Fcustom-entity-types.JPG?alt=media\&token=37720bce-ce8d-4835-9aa0-145b8311ecd6)

Each Custom Entity Type is characterised by a unique type name and the option to provide a description, clarifying the entity's purpose and significance in the chatbot's interactions.

This feature empowers users to create a highly tailored chatbot experience that accurately interprets and responds to user input.


# Agent Responses

Craft bot responses that resonate with your audience and align with project goals

Within this section, you gain the ability to customize your bot's responses to cater to users across multiple supported languages. Explore the following sub-pages to fine-tune your chatbot's interactions:

**Multilingual Responses**

Navigate through language options to define responses tailored to various supported languages, ensuring a localised and user-friendly experience.

**Support-Unavailable Responses**

Specify responses for situations when a backend support executive is unavailable to handle an escalated chat, maintaining user engagement and satisfaction.

**Missed-Query Responses**

Craft pre-escalation messages to efficiently address missed queries, enhancing user interactions and ensuring a seamless chatbot experience.

Multilingual Responses empowers you to create a chatbot that excels in engaging users across diverse linguistic contexts while effectively managing support scenarios.


# Multilingual Responses

Deliver seamless multilingual experiences by customising bot responses for diverse users

Within this section, you gain the ability to customize your bot's responses to cater to users across multiple supported languages.

To add a response, use the action button "+", and you can conveniently search for existing responses by typing the name in the search bar.


# Missed Query Responses

Re-engage users effectively with tailored responses when queries are missed

In the dynamic landscape of chatbot interactions, there are instances when queries may go unanswered or require special attention. The Missed-Query Responses section is your tool to proactively address these situations, ensuring a seamless and user-friendly experience.&#x20;

Here's what you need to know:

**Crafting Pre-Escalation Messages**

* Tailor pre-escalation messages to efficiently guide users when their queries have been missed or require further clarification.
* Create messages that reassure users, provide context, and prompt them to engage in a productive conversation with the chatbot.


# Support-Unavailable Responses

Maintain user engagement even when support is unavailable with customized responses

In the world of chatbot support, there are moments when a backend support executive may be unavailable to handle escalated chats. The Support-Unavailable Responses section equips you with the means to manage such scenarios effectively.&#x20;

Here's how:

**Defining Support-Unavailable Responses**

* Specify responses that convey to users that a support executive is currently unavailable to assist them.
* Create messages that assure users their concerns will be addressed promptly once support is available.


# Directive Utterances

Take control of user interactions by customising how your chatbot responds to various directives

In this section, you gain the ability to tailor your chatbot's inputs and outputs to meet your project's unique needs.&#x20;

Directive Utterances empower you to customise the way your chatbot interprets user inputs and responds, ensuring a personalised and effective conversational experience


# Customize Inputs

Tailor user input recognition for a more natural and efficient chatbot interaction

In this section, you have the power to tailor your chatbot's responses to a variety of user inputs, ensuring a conversational experience that aligns with your project's unique needs.

Explore the different directive types that can be customized to enhance your chatbot's conversational versatility:

**YES**

Customize how the chatbot recognizes affirmative responses, including variations like "Roger that" and "Affirmative."

**NO**

Define how the chatbot understands negative responses, encompassing expressions like "Negative" and "Not really."

**DONT\_KNOW**

Tailor the chatbot's response to user expressions of uncertainty, such as "Don't have a clue" and "No idea."

**EOC (End of Conversation)**

Customize how the chatbot acknowledges the user's desire to end the conversation, offering responses like "Terminate this conversation" and "Exit."

**APPRECIATION**

Craft responses that reflect the chatbot's appreciation of user satisfaction, with expressions like "Appreciate the help" and "Thanks for the service."

**CONFIRM\_CLOSURE**

Tailor the chatbot's confirmation responses when a user requests to close the chat, providing variations like "Exit the chat" and "Please close."

**ESCALATE**

Define how the chatbot responds when a user expresses a desire to speak with an associate, with phrases like "Talk with the associate" and "Connect me with support."

**CANCEL\_PROCESS**

Customise the chatbot's response when a user wants to halt the execution of a specific intent, offering options like "Cancel this process" and "Stop the flow."

By customizing inputs, you empower your chatbot to interpret and respond to a diverse range of user expressions, creating a tailored and responsive conversational experience.


# Customize Outputs

Craft personalized bot responses and messages to enhance user interactions and engagement

In this section, you have the flexibility to customise the way your chatbot communicates with users by tailoring various agent outputs to meet your project's specific requirements.

Explore the different directive types that can be customised to enhance your chatbot's responses:

**MY\_EOC (End of Conversation)**

* Customise the message displayed by the bot at the end of a conversation.
* Default message: "Bye. See you."

**GOAL\_STIMULUS**

* Tailor the welcome message when the agent label is not set, ensuring a personalised greeting.
* Default message: "Hi User-Name! How can I help you?"

**NEXT\_GOAL\_STIMULUS**

* Customise the message displayed after the completion of an intent, guiding users to their next interaction.
* Default message: "How can I assist you again?"

**ACK\_APPRECIATION**

* Define the bot's acknowledgment message in response to user appreciation.
* Default message: "Happy that I could be of help."

**CONFIRM\_CLOSURE**

* Tailor the confirmation message when a user requests to close the conversation.
* Default message: "Are you sure you want to close this conversation?"

**SUPPORT\_BUSY\_CLOSURE**

* Customise the message when a supervisor doesn't respond after picking up an escalated conversation.

**ESCALATING**

* Define the message displayed when a chat is being escalated to a supervisor.
* Default message: "Please hold on while I transfer you to a customer service executive to serve you better."

**PROCESS\_SWITCH\_BACK**

* Tailor the message asking users if they want to continue with their previous query.
* Default message: "Do you want to continue with your previous query?"

**PROCESS\_CANCELLED**

* Customise the message displayed after cancelling a process.
* Default message: "OK, it's cancelled."

**LEAVING\_4\_MAINTENANCE**

* Define the message announcing chatbot maintenance is about to begin.

**CHAT\_UNAVAILABLE**

* Customise the message displayed when the chatbot is undergoing maintenance.
* Default message: "Sorry, I am currently unavailable to chat with you. There is a scheduled server upgrade happening right now to improve my performance. Please try chatting again after a few minutes. Apologies for any inconvenience. See you soon. Goodbye."

**REPEATING\_UTTERANCE**

* Tailor the message shown when the user is having trouble understanding the asked query.
* Default message: "Sure, let me repeat that for you... {Original-Utterance}"

**I\_DONT\_KNOW**

* Customize the message when the bot is unable to understand the user's query.
* Default message: "No idea, I don't know, I'm not aware of that."

With the ability to customise these outputs, you can create a chatbot that delivers tailored and effective responses to users, meeting their specific needs and expectations.


# Translations

Translation is an art which transforms everything so that nothing changes

Dhee empowers you to seamlessly perform translations across various entities, including prompt utterances, multilingual text, slot templates, and more.&#x20;

Within this section, you can effortlessly access and review all the translated utterances.

<figure><img src="https://2566128011-files.gitbook.io/~/files/v0/b/gitbook-x-prod.appspot.com/o/spaces%2FUn1oKrw7P8P5qiTjWXjv%2Fuploads%2FBG36kmKR3CDY5s3Nim7n%2Ftranslations-ss.png?alt=media&amp;token=96f85527-a998-4ac7-a6dd-4f2771db90bb" alt=""><figcaption></figcaption></figure>


# Query Substitutions

Sometimes, several words can represent only a single word

In the realm of language, there are numerous ways to express a single concept or word. Query substitutions play a crucial role in ensuring that your chatbot comprehends these variations and provides consistent responses.

**Creating Original-to-Substitute Pairs**

* In the ORIGINAL column, list the various ways a word or concept can be expressed.
* In the SUBSTITUTE column, specify the substitute to replace the original utterance.

<figure><img src="https://2566128011-files.gitbook.io/~/files/v0/b/gitbook-x-prod.appspot.com/o/spaces%2FUn1oKrw7P8P5qiTjWXjv%2Fuploads%2Fu3JNFxGIkXJsSua3prBI%2Fsubstitute-ss.png?alt=media&amp;token=ce9487f4-6915-4599-979d-5e802a4f281d" alt=""><figcaption></figcaption></figure>

By incorporating query substitutions, you simplify communication and improve the chatbot's ability to interpret user input accurately.


# Abbreviation Texts

The word abbreviation sure is long for what it means...

Abbreviation texts offer a quick and efficient way to convey complex words or phrases in a concise manner, enhancing communication efficiency.

&#x20;In this section, you can harness the power of abbreviation texts by adding them along with their respective expansions.

<figure><img src="https://2566128011-files.gitbook.io/~/files/v0/b/gitbook-x-prod.appspot.com/o/spaces%2FUn1oKrw7P8P5qiTjWXjv%2Fuploads%2FKX1Zg8XCNx5Jwr7bgSJj%2Fabbreviation-text-ss.png?alt=media&amp;token=6ffb4d8a-f32d-4449-8980-be00bb5f8c15" alt=""><figcaption></figcaption></figure>


# Test & Deploy

Streamline your chatbot journey: Build, Test, and Deploy with precision for a seamless digital presence

In this comprehensive section, you can seamlessly build, test, and deploy your chatbot across a multitude of platforms, ensuring widespread accessibility and optimal performance.


# Build

Configured bot can be build for testing and deployment using the *Test\&Deploy->Build* Section.

![Build](https://2566128011-files.gitbook.io/~/files/v0/b/gitbook-x-prod.appspot.com/o/spaces%2FUn1oKrw7P8P5qiTjWXjv%2Fuploads%2FXzxXIqdvvz4u8ziGelGF%2Fbuild.JPG?alt=media\&token=c3af65cf-103a-4510-b084-9a5dd581e217)

The build process can be triggered using the `Build` button. This would trigger the build for the NLP Model and Voice Model. The progress can be monitored using the progress bar as well as the *Overall Status* indicator.

At anytime, User can visit the section to know when was the last build done. This is shown in the message at the top of the section.

```
Last built with the status COMPLETE on 6/4/2022, 6:00:00 pm
```

Additionally User has the ability to perform a `Clean & Build`.


# Test

Dhee.AI facilitates testing of the bot before deploying. This is highly useful to figure out early bugs. The developer can test the bot using the *Test and Deploy->Test*.

![](https://2566128011-files.gitbook.io/~/files/v0/b/gitbook-x-prod.appspot.com/o/spaces%2FUn1oKrw7P8P5qiTjWXjv%2Fuploads%2F8uEdcXBC8uBQHh6g09nD%2Ftest-main-ui.JPG?alt=media\&token=fa280634-d052-4c57-bdca-d5eae6bbb543)

The Test UI is divided into two key subsections.

## Testing your bot.

You can test the Agent using the *Test Agent* section of the Test Module.

![](https://2566128011-files.gitbook.io/~/files/v0/b/gitbook-x-prod.appspot.com/o/spaces%2FUn1oKrw7P8P5qiTjWXjv%2Fuploads%2FCUtby3ijt7aK5gnB6xLi%2Ftest-agent.JPG?alt=media\&token=2572bd04-09f3-45a5-b51b-ce9d01334a1d)

You can provide the language of your choice, along with Username and phone number. You could also opt to skip providing Username and phone number. This would invoke the agent.

You can now test your bot by communicating with it.

![](https://2566128011-files.gitbook.io/~/files/v0/b/gitbook-x-prod.appspot.com/o/spaces%2FUn1oKrw7P8P5qiTjWXjv%2Fuploads%2FmoKru55qfOrwrYPcnXaa%2Ftest-agent_sayhello.JPG?alt=media\&token=33872f4f-3fd8-4106-ad8e-819160e37248)

The bot would identify the intent and respond with prompts for providing slots, if it is missing.

You can use the Test Agent to test your bot within the sandbox environment.

#### Debug Insights

Dhee.AI also allows you to debug your bot and understand the behavior better. This is useful for developers in understanding the response of the bot to queries.

![](https://2566128011-files.gitbook.io/~/files/v0/b/gitbook-x-prod.appspot.com/o/spaces%2FUn1oKrw7P8P5qiTjWXjv%2Fuploads%2FpqquhwISndRhiImq0bJt%2Ftest-debug-insights-main.JPG?alt=media\&token=7559cac3-4e38-419a-a56d-86740f5ddaf1)

**Parse**

The Parse section allows the developer to debug the bot and understand the parsed information (described in JSON format). Developer can use these insights to define their bot better.

![](https://2566128011-files.gitbook.io/~/files/v0/b/gitbook-x-prod.appspot.com/o/spaces%2FUn1oKrw7P8P5qiTjWXjv%2Fuploads%2FskrHHmNlJcK0bfKAntRD%2Ftest-debug-insights-parse.JPG?alt=media\&token=41e0003e-3479-4a91-807a-52dada5cab55)

**Extract Intent**

If the developer needs to verify that the bot is correctly recognizing the intent in the test environment, he can use the *Extract Intent* section.

![](https://2566128011-files.gitbook.io/~/files/v0/b/gitbook-x-prod.appspot.com/o/spaces%2FUn1oKrw7P8P5qiTjWXjv%2Fuploads%2FUonQc4iqITrZUXaJegaO%2Ftest-debug-insights-extract-intent.JPG?alt=media\&token=a171ee30-74c4-49ca-8f5b-87315819ff54)

This would display the intent identified by the bot.  The output is displayed as JSON. For example,

```
Output

{
  "success": true,
  "result": {
    "userIntent": {
      "createdBy": "35dad000-9246-11ea-9ba6-69dfff26a0d5",
      "createdDate": 1644827200351,
      "lastModifiedBy": "e2b0c7a0-7b27-11ec-b23b-837257ce5410",
      "lastModifiedDate": 1645330104597,
      "id": "d5705d80-8d6f-11ec-b6a7-a372c48d3432",
      "name": "applyLeave",
```

Once again, these insights would help in further improving the bot performance.

**Extract Slot**

Similarly, the slots recognition could be debugged using the *Extract Slot* section.

![](https://2566128011-files.gitbook.io/~/files/v0/b/gitbook-x-prod.appspot.com/o/spaces%2FUn1oKrw7P8P5qiTjWXjv%2Fuploads%2Fe4h1knZiD3X0ZHP7Hfa0%2Ftest-debug-insights-extract-slot.JPG?alt=media\&token=c2448d37-4c70-4540-b056-05d619e7eb8d)

Consider the following Text.

```
I want to take leave from 24th
```

Debugging the text in *Extract Slot* would result in the following

```
{
  "startDate": {
    "value": "24-03-2022",
    "tokenOrder": 7,
    "sentenceId": "fb37db2a-73f5-4ca8-a8d7-ebde25c0d78e"
  }
}
```

Based on the configured slots and thier configuration, the bot would be able to identify the slots. The debug output is displayed as JSON


# Deploy


# Launchpad

Your chatbot's command centre for deployment and project plan management, providing easy deployment, updates, and plan customisation.

### Deploying Your Chatbot

If your chatbot is not yet deployed, you can initiate the deployment process from this section. The deployment process is quick and easy, making your chatbot available to interact with users.

### Redeploying Your Chatbot

For continuous improvement, you can redeploy your chatbot after further training or updates. This ensures that your chatbot is always up-to-date and provides the best possible user experience.

### Undeploying Your Chatbot

In case you need to take your chatbot offline temporarily or permanently, you can undeploy it from this section. This action will make your chatbot inaccessible to users.

### Project Plan

You can view and manage your selected project plan from the Launchpad. We offer a range of plans to suit different project requirements, including Starter, Professional, Premium, Enterprise, and Enterprise Plus.

### Upgrading Your Project Plan

If your project's needs have evolved, you can easily upgrade your project plan. This allows you to access enhanced features and capabilities that better align with your evolving objectives.

The Launchpad simplifies the process of managing your chatbot's deployment and project plan, ensuring that your chatbot is always optimized for your project's success. If you have any questions or need assistance, don't hesitate to consult our documentation or contact our support team for guidance.


# Widget

Enhance your website with a chatbot using the Dhee webview widget

In this section, we provide you with the tools to integrate a webview widget for your chatbot, making it accessible directly on your website. The process is straightforward and involves the following steps:

1. **Add an APP ID**: Begin by assigning a unique APP ID, which serves as a distinctive identifier for your webview widget. For example, you could choose "my\_dhee\_widget" as your APP ID.
2. **Specify the Domain**: Next, input the domain name of your website (e.g., [www.mycompany.com](http://www.mycompany.com/)). This step is essential for integrating the widget seamlessly into your site.
3. **Generate JavaScript Code**: Once you've provided the APP ID and domain, simply click the "Generate" button. This action will produce a JavaScript code snippet.
4. **Embed the Code**: To make the chatbot accessible on your website, place the generated JavaScript code snippet in the footer section of your website's webpage. This code will activate the chatbot on your site.


# Signal

Want to bring your chatbot to Signal? We've got you covered with a quick setup

Are you ready to take your chatbot to Signal? Here's how you can get it up and running in no time:

1. **Add Mobile Number**: Provide your registered mobile number along with the country code (e.g., +91).
2. **Register**: After entering your mobile number, click the "Register" action button.

This straightforward process allows you to integrate your chatbot with Signal, enabling it to interact with users on this social platform. Connect with your audience and engage in meaningful conversations right from Signal.


# Telegram

Let's give your chatbot a new home on Telegram, where conversations come to life!

If you want to integrate your chatbot with Telegram, follow these simple steps:

1. **Activate Telegram**: Click on the "Activate Telegram" slider to initiate the integration process.
2. **Configure Telegram**: Provide the following Telegram configuration details:
   * **Telegram Bot Name**: Specify your chatbot's name on Telegram.
   * **Access Token**: Enter your Telegram Access Token.
3. **Save Configuration**: After entering the required information, make sure to save your Telegram configuration.

With these steps, your chatbot will be seamlessly integrated with Telegram, allowing you to engage with users on this messaging platform.


# Google RCS

Unlock the power of Google RCS by seamlessly integrating your chatbot, expanding your reach and enhancing user interactions

Ready to make your chatbot a part of Google RCS? It's a fantastic way to reach more users and create engaging conversations. Here's how you can do it:

1. **Activate Google RCS**: Start by clicking the "Activate Google RCS" slider. This is the first step to bringing your chatbot to the Google RCS platform.
2. **Configure Google RCS**: Now, let's get your chatbot ready for Google RCS:
   * **RCS Client Token**: Enter the RCS Client Token for your chatbot.
   * **API Key**: Safely provide the API Key required for integration.
3. **Save Configuration**: Don't forget to save your Google RCS configuration settings to complete the integration.

With these steps, your chatbot will be seamlessly integrated with Google RCS, allowing you to reach a broader audience and deliver exceptional user experiences on this platform. Get ready to have meaningful conversations and provide valuable assistance to users on Google RCS!


# Facebook

Elevate your chatbot's presence on Facebook Messenger, where millions of users are waiting to engage with you

Ready to bring your chatbot to Facebook Messenger? It's a fantastic platform with millions of potential users. Here's how to make it happen:

1. **Activate Facebook Messenger**: Start by clicking the "Activate Facebook" slider. This is the first step to establishing your chatbot on Facebook Messenger.
2. **Configure Facebook Messenger**: Now, let's get your chatbot ready for Facebook Messenger:
   * **FB Page ID**: Provide the Facebook Page ID associated with your chatbot.
   * **App ID**: Enter your App ID to ensure seamless integration.
   * **Page Key**: Safely input your Page Key for authentication.
   * **Webhook Key**: Add your Webhook Key for the connection.
3. **Save Configuration**: Don't forget to save your Facebook Messenger configuration settings to complete the integration.

With these steps, your chatbot will be seamlessly integrated with Facebook Messenger, allowing you to engage with a vast user base and provide valuable assistance to users on this popular messaging platform.


# Alexa

Join the voice revolution with Alexa integration and offer your chatbot's assistance through spoken interactions

Ready to empower your chatbot with voice capabilities on Alexa? It's an exciting step that enables spoken interactions and extends your chatbot's capabilities. Here's how to make it happen:

1. **Activate Alexa**: Start by clicking the "Activate Alexa" slider. This is the first step in immersing your chatbot into the world of voice-enabled interactions with Alexa.
2. **Configure Alexa**: Now, let's set up your chatbot for Alexa:
   * **Alexa Skill ID**: Provide the unique Alexa Skill ID associated with your chatbot.
   * **Skill Name**: Choose a name for your skill to ensure a smooth and intuitive integration with Alexa.
3. **Save Configuration**: Don't forget to save your Alexa configuration settings to complete the integration.

With these steps, your chatbot will seamlessly integrate with Alexa, offering spoken interactions and taking your user engagement to the next level. Initiate conversations, answer questions, and deliver exceptional voice experiences with your chatbot on Alexa!


# Whatsapp

Get ready to connect your chatbot to WhatsApp, and choose from various integration options

WhatsApp integration is your gateway to exciting possibilities for your chatbot. You have the flexibility to connect with Meta WhatsApp, ACL WhatsApp, Infobip WhatsApp, Pinnacle WhatsApp, or Sinch WhatsApp, each with its own set of features. Here's how you can make it happen

**Meta WhatsApp Integration:**

To begin, click on "Activate Meta WhatsApp" to initiate the integration.

* **Phone Number**: Provide the phone number associated with your Meta WhatsApp integration.
* **Phone Number ID**: Specify the unique Phone Number ID.
* **WH Verification Token**: Enter the WH Verification Token.
* **Access Token**: Input the required Access Token.

**ACL WhatsApp Integration:**

Start by clicking "Activate ACL WhatsApp" to kickstart the integration.

* **Webhook**: Configure the webhook for your ACL WhatsApp integration.
* **Sender WhatsApp Number**: Provide the Sender WhatsApp number.
* **Username**: Enter your username.
* **Password**: Securely input your password.

**Infobip WhatsApp Integration:**

Click on "Activate Infobip WhatsApp" to begin the integration.

* **Webhook**: Configure the webhook for your Infobip WhatsApp integration.
* **Token**: Specify the required Token.
* **Sender WhatsApp Number**: Provide the Sender WhatsApp Number.

**Pinnacle WhatsApp Integration:**

Initiate the integration by clicking "Activate Pinnacle WhatsApp."

* **API Key**: Enter the API Key.
* **WA Number**: Provide the WhatsApp number associated with your Pinnacle integration.

**Sinch WhatsApp Integration:**

Start by clicking "Activate Sinch WhatsApp" to get started with the integration.

* **WA Number**: Specify the WhatsApp number for your Sinch integration.
* **Username**: Enter your username.
* **Password**: Securely input your password.
* **Custom Webhook (if present)**: Add the custom webhook if required.

Choose the WhatsApp integration that aligns with your requirements and offers the features you desire. With these options, your chatbot can expand its reach and engage with users on one of the world's most popular messaging platforms.


# Custom App


# Voice


# Telephony


# Email


# Reports

For the sages who seek deeper and deeper insights.

Reports cater to those seeking deeper insights, emphasising Dhee's commitment to enhancing both end-user and developer experiences, especially after your bot's release to customers.

![](https://2566128011-files.gitbook.io/~/files/v0/b/gitbook-x-prod.appspot.com/o/spaces%2FUn1oKrw7P8P5qiTjWXjv%2Fuploads%2FYPGmYTOyHnTy5oCH0k9p%2Freports_banner.png?alt=media\&token=292478eb-5b68-4bbb-90b0-a7fd4d798c15)

Learn about the different reports Dhee can create for your in this chapter.

{% content-ref url="/pages/5fgF0nqjvPYaFDEYGrtQ" %}
[Statistics](/platform-reference/reports/statistics)
{% endcontent-ref %}


# Statistics

Everybody likes Pie-charts!

This is the primary tab where you can access various usage statistics for your Dhee.AI bot. It includes subsections such as usage summaries, daily, weekly, monthly usage information, and more.

![](https://2566128011-files.gitbook.io/~/files/v0/b/gitbook-x-prod.appspot.com/o/spaces%2FUn1oKrw7P8P5qiTjWXjv%2Fuploads%2F9owVuXptDRB1E1geHlpv%2Freports.png?alt=media\&token=5c8aba1c-03db-42de-98f9-129d6eac5a56)

{% content-ref url="/pages/YDDaPW1iOYhs0OddrZVP" %}
[Summary](/platform-reference/reports/statistics/summary)
{% endcontent-ref %}

{% content-ref url="/pages/ti043u3Bkg1Z5SZ5F1cx" %}
[Daily Reports](/platform-reference/reports/statistics/daily-reports)
{% endcontent-ref %}

{% content-ref url="/pages/3NOABoBfLHlEXgqtx96s" %}
[Weekly Reports](/platform-reference/reports/statistics/weekly-reports)
{% endcontent-ref %}


# Summary

The high class needs the cumulative numbers. You Sir, are high class!

Here you find a high level summary of how your bot is performing. Like the ones you see below:

![](https://2566128011-files.gitbook.io/~/files/v0/b/gitbook-x-prod.appspot.com/o/spaces%2FUn1oKrw7P8P5qiTjWXjv%2Fuploads%2FdJBnXvzlsx0QjjHa0Laz%2Fsummary.png?alt=media\&token=29243d0e-c497-4fd2-af9f-2f65008f4384)

### Conversation Summary

![](https://2566128011-files.gitbook.io/~/files/v0/b/gitbook-x-prod.appspot.com/o/spaces%2FUn1oKrw7P8P5qiTjWXjv%2Fuploads%2FqA4rfLhLOlbAbDZp7Xe6%2FNumber%20Of%20Conversations.png?alt=media\&token=285d1fb7-262c-4123-b43b-94704fddaa5b)

A summary of conversations with the User is available in the Conversation Summary Section. These include

* Number of Conversations (Yesterday)
* Number of Conversations (Since last 7 days)
* Number of Conversations (Since last 30 days)

### Queries Summary

![](https://2566128011-files.gitbook.io/~/files/v0/b/gitbook-x-prod.appspot.com/o/spaces%2FUn1oKrw7P8P5qiTjWXjv%2Fuploads%2F9d7CeMbE198RRMU6FRhc%2FQuery%20summary.png?alt=media\&token=7bbdc211-d89c-421f-b60a-ce890515c6ee)

During each conversation, the bot could serve the users with several queries. The summary of queries served by the bot is available in the Query Summary section. These include

* Number of Queries Served (Yesterday)
* Number of Queries Served (Since Last 7 Days)
* Number of Queries Served (Since last 30 days)

### Average Queries Summary

![](https://2566128011-files.gitbook.io/~/files/v0/b/gitbook-x-prod.appspot.com/o/spaces%2FUn1oKrw7P8P5qiTjWXjv%2Fuploads%2Fij9oNTTYFeLojEg9NDtT%2FAv.Query%20Summary.png?alt=media\&token=9b65ddb3-eb6f-4ba6-85b2-d14b0d8f63a7)

The average number of Queries served per conversation can be obtained from the Average Queries Summary Report. These include

* Average Queries Per Conversation (Since Yesterday)
* Average Queries Per Conversation (Since last 7 days)
* Average Queries Per Conversation (Since last 30 days)

### User Summary

![](https://2566128011-files.gitbook.io/~/files/v0/b/gitbook-x-prod.appspot.com/o/spaces%2FUn1oKrw7P8P5qiTjWXjv%2Fuploads%2Fk8nUxyzDzuOu1cCa84VD%2Fuser%20summary%20.png?alt=media\&token=d10a97f6-eccc-42c1-a632-ce9a0aa04382)

Reports on Users who have used the bot can be summarized in the User Summary Report. These include

* Number of Users (All time)
* Number of Unique Users (All time)
* Number of Anonymous Users (All time)

The anonymous users are the user who did not provide names or contact details.


---

[Next Page](/llms-full.txt/1)